Window tint installation can cut glare, block UV, and reduce cooling costs, but the process often feels opaque to homeowners and property managers. This guide for Portland, Salem, Eugene, and Bend walks you through the full workflow, covering consultation and film selection, the day-of installation steps installers use, a practical pre-install checklist, realistic cost and timeline benchmarks, and aftercare and warranty essentials. You will finish knowing how to prepare your property, what disruption to expect during installation, and which film types match your energy, privacy, or security goals.
1. Types of window tint installations and how they influence the process
Key point: the film you pick dictates the installation technique, the crew, the timeline, and often the warranty. Interior solar films install faster and cleaner in controlled conditions; exterior and safety films demand different tools, access, and more curing time.
How each installation type changes the job
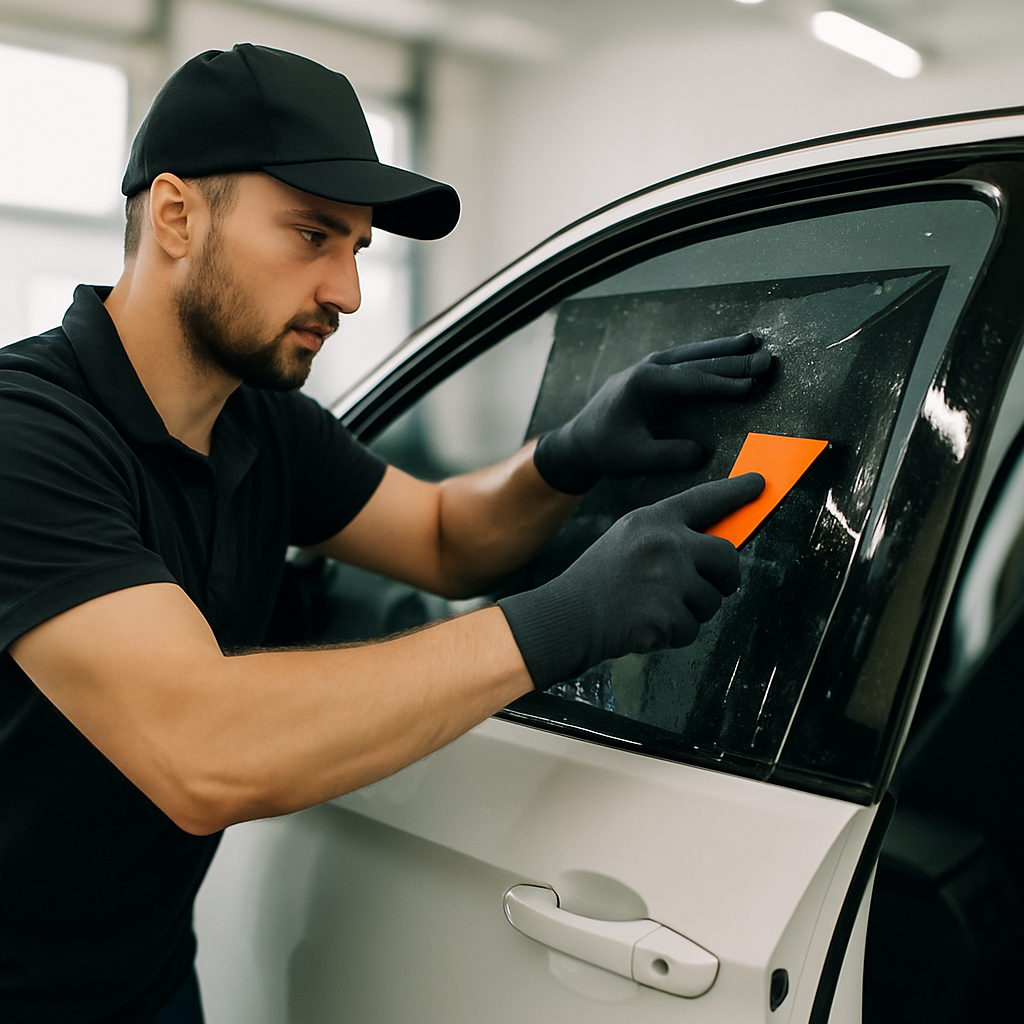
- Interior solar control films: Standard for most homes. Installers use wet-application, squeegees, precision trimming, and sometimes heat shrink on curved panes. Minimal scaffolding and a two-person crew will usually finish a typical room in a day.
- Exterior films: Used when interior access is impossible or for certain retrofit situations. Exterior work requires weather windows, scaffolding or lifts, and specialized adhesives. Expect longer scheduling lead times and the need for rapid drying or heat tools in cold weather.
- Safety and security films: Thicker, multi-layer films that require more aggressive edge sealing, longer cure time, and often mechanical anchoring for high-security specs. Installation is slower, may need extra helpers for large sheets, and can require cutting out old glazing tape or trim.
- Decorative and privacy films: Precision cutting and alignment matter. Logos, frosts, and patterned films take longer per pane and may be templated in-shop then fitted on-site, increasing pre-install preparation but reducing on-site time.
- Commercial low-e and solar control systems: Often specified for energy performance. These jobs frequently need phased installation, careful coordination with building managers for elevator and HVAC access, and certified installers to preserve manufacturer warranties.
Practical insight: choose by mission not price. If the priority is glare reduction with minimal visual change, a neutral high-performance film like 3M Prestige tends to keep installers working from indoors with less scaffolding. If the priority is forced-entry resistance, expect double the labor time and extra materials for anchoring and edge sealing.
Trade off to know: exterior installations can avoid interior disruption but increase risk from weather and often shorten film life due to UV and abrasion. Also, applying film to insulated glass units on the outside can affect warranties for the glazing assembly; always confirm with the glass manufacturer and the film maker.
Concrete example: A Portland bungalow received 3M Prestige interior solar control film on south facing living room windows; a two person crew completed the work in a single day with minimal furniture movement and preserved outward views. By contrast, a Salem storefront needing LLumar SelectPro on the facade required a three day window with scaffolding and evening work to avoid disrupting tenants during business hours.
Install method matters as much as product. Two installations that use the same film manufacturer can look and last very differently depending on whether the film is fitted inside, outside, or specified as a safety application.
Next consideration: once you know which type of film matches your objective, the installation constraints become logistical choices: daytime versus evening work, scaffold versus ladder, single-day interior installs versus phased commercial rollouts. Make that decision before quoting so the installer prices labor accurately and you avoid schedule surprises.
2. Consultation, measurement, and choosing the right film
Start with measurable objectives, not color samples. A proper consultation breaks down what you want to achieve — heat reduction, UV protection, privacy, or impact resistance — then maps those goals to measurable performance: visible light transmission (VLT), solar heat gain coefficient (SHGC), and UV rejection.
What installers check on site and why it matters
| Measured item | Why it changes the install or product choice |
|---|---|
| Exact glass dimensions, sight lines, and muntin layout | Determines whether film is templated in-shop, pre-cut, or trimmed in place; affects fit around grills and sash. |
| Glass type and condition (single pane, IGU, low-e, scratched seals) | Low-e coatings and failing insulating seals change adhesion expectations and may rule out exterior applications. |
| Frame profile and reveal depth | Shallow reveals need precision edge sealing; deep frames may hide edge lift but add trimming complexity. |
| Obstructions and access (trim, blinds, nearby landscaping, scaffolding needs) | Affects labor, whether exterior approach is needed, and scheduling for lifts or night work. |
| Interior environment (temperature, humidity, HVAC schedule) | Install quality and adhesive curing depend on reasonably controlled conditions; extreme cold or damp delays work. |
Selection criteria are trade-offs, not upgrades. Expect to balance heat reduction, retained view, and exterior appearance. For example, ceramic films achieve heat and clarity without metallic reflection; dyed films are cheap but fade and block less heat. Prioritize SHGC and UV rejection for energy or fade protection, and VLT when preserving outward views matters.
- Key selection questions: Which matters more — maximum heat control or minimal change to appearance? Do you need intrusion resistance or just glare control? Are there HOA or historic-district constraints on exterior reflectivity?
Practical insight: installers in Oregon will often recommend neutral, high-performance films over very dark tints for south- and west-facing windows because they deliver the same or better SHGC reduction while preserving view and avoiding exterior glare that attracts HOA complaints. Darkness alone is a poor proxy for performance.
Concrete example: A Eugene duplex had repeated break-ins on the ground floor. During the site visit we measured narrow sash reveals and uneven glass edges; that ruled out a mechanically anchored exterior system. The team specified a 8 mil Madico safety film with aggressive edge sealing installed from the inside and custom-cut in the shop to avoid on-site trimming. The job required temporary removal of interior trim and two installers over two days.
If an installer skips measuring reveal depth and IGU condition during the estimate, consider that a red flag — those two details change both product and labor estimates significantly.
Decision guidance: insist on quote line-items that separate materials from labor and note whether the installer is an authorized dealer for brands like 3M or LLumar. Certification matters less for salesmanship and more for correct product matching and post-install support.
3. Step-by-step installation workflow used by professional installers
Direct statement: Professional installers execute a tight sequence to reduce rework: accurate templates, meticulous surface prep, controlled wet application, precision squeegeeing, and a focused quality check. Each step has small tolerances that determine long-term adhesion and appearance.
Day-of sequence and what crews actually do
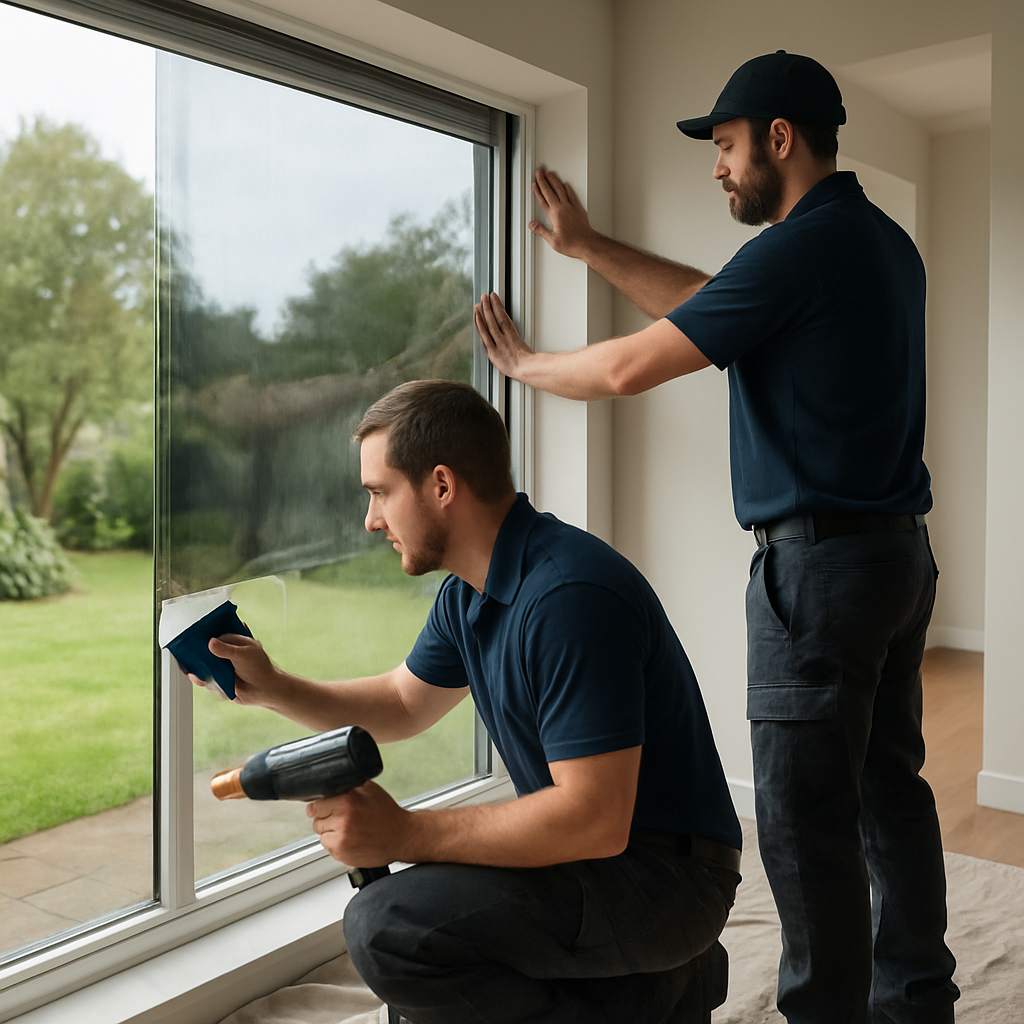
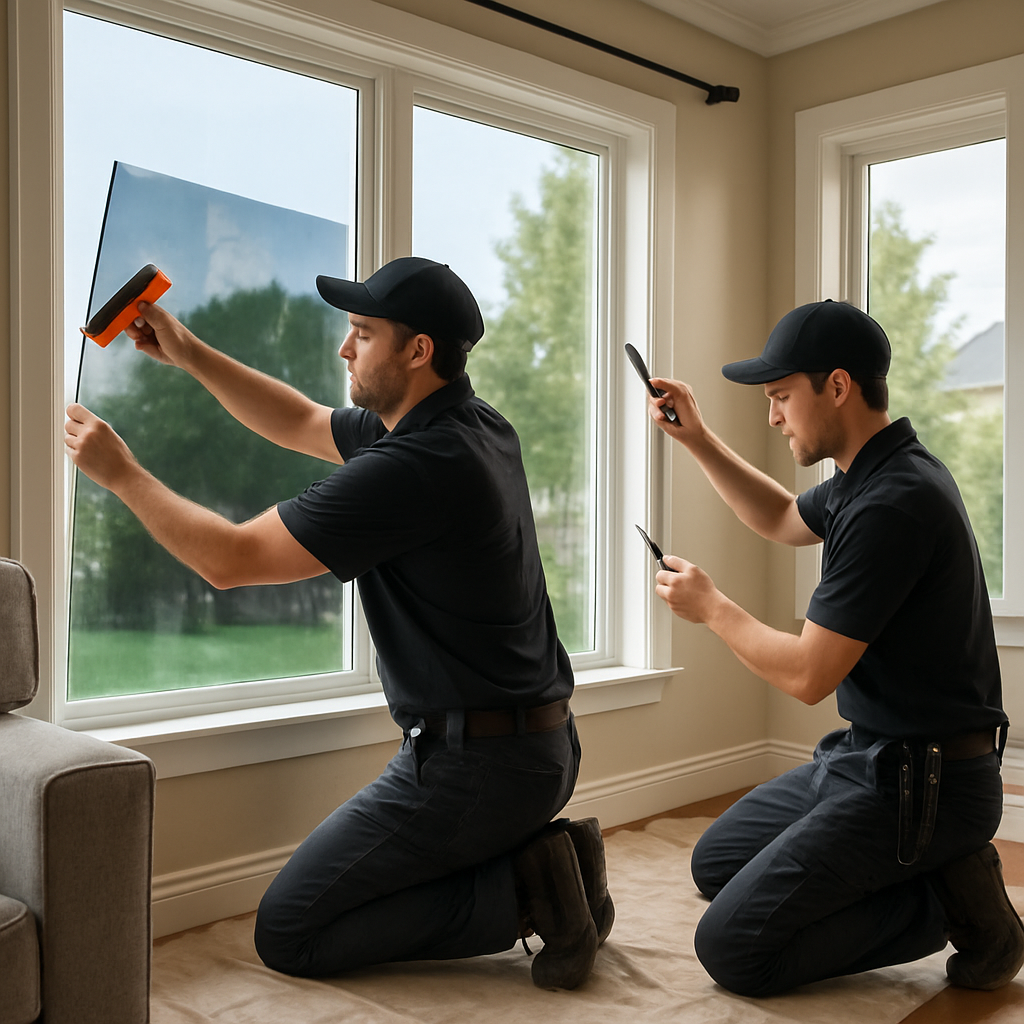
- Prep and staging: installers set floor protection, position tools and ladders, confirm temperature/humidity, and stage pre-cut panels or templates. Typical crew: two technicians for a residential job, three-plus for large commercial façades.
- Final fit verification: measure final glass sizes at the pane, not the frame. If dimensions differ from the shop template, the team adjusts the cut on-site to avoid puckering later.
- Surface cleaning: deep clean with deionized water and a low-residue detergent, removing silicone, paint overspray, and old glazing tape. This is the step where most failures begin if skipped.
- Slip-and-position (wet application): apply slip solution, position film, then use a series of squeegee passes to drive moisture and air out toward the edges. Installers stage trimming only after the film is stable.
- Heat forming and edge work: for bowed or curved glass technicians use controlled heat guns to relax the film, then final trim and edge sealing where specified. Exterior or safety films get additional mechanical anchoring or stronger sealants.
- Final squeegee and cleanup: repeat squeegee passes to final acceptance standard, remove trimmings, and clean both interior and exterior work zones.
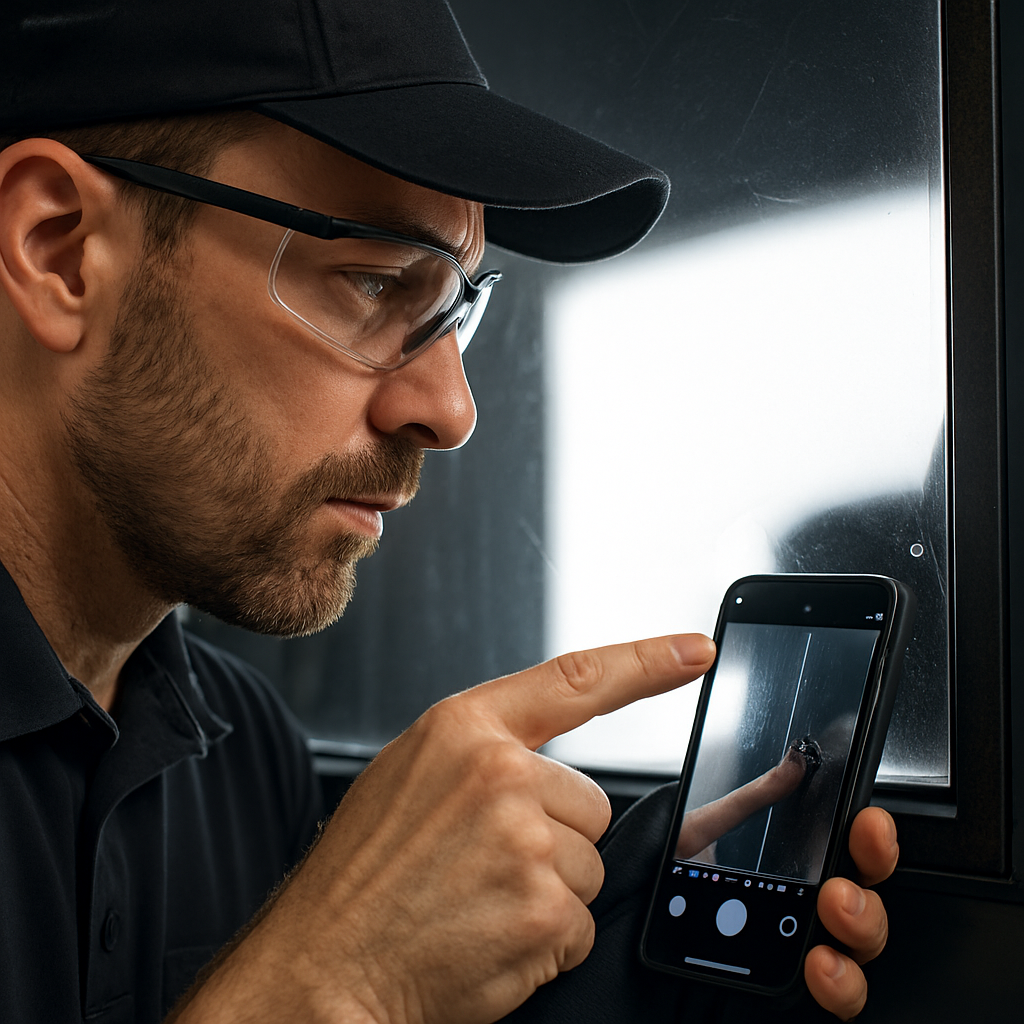
- Quality control and documentation: inspect for straight edges, no trapped particulates, uniform adhesion at edges, and take time-stamped photos for warranty records.
Practical trade-off: having film pre-cut in the shop saves on-site time but increases risk if measurements shift due to thermal expansion or hidden muntin profiles. Many pros use a hybrid approach: rough pre-cut in shop, final precision trimming on-site.
Limitation to respect: heat guns speed shaping but can damage IGU seals or low-e coatings if used aggressively. If a pane shows delamination risk or baked-on contaminants, the installer should stop and recommend glass repair or replacement instead of forcing film.
Concrete example: A Southeast Portland mid-century home had slightly bowed picture windows and thin wood reveals. The crew templated panels in the van, performed a controlled heat-shrink sequence on-site, and used a bead of specialized edge sealant to prevent lifting. The two-person crew completed the living room in a day, but the curved panes required an extra 90 minutes each for careful shaping and inspection.
Key on-site checks: straight squeegee lines, no particulate specks, consistent edge wetting, and a photo record for every facade — these are the signals of a professional install.

Next consideration: confirm whether your quote assumes shop pre-cut panels or full on-site templating — that choice affects both price and the time you need to block off for the crew.
4. How to prepare your home or business before installers arrive
Start with logistics. The single biggest cause of delays is poor access and unclear on-site responsibility. Confirm who will meet the crew, where they can park, where installers can stage toolboxes, and whether building entry requires badges or escorts.
Residential preparation checklist
- Clear an access lane: move chairs, plants, and lamps so installers have an unobstructed path to each window and room; leave room for a ladder and a small work table.
- Protect floors and surfaces: roll up rugs or provide plywood or drop cloths over hardwood; expect some water spray during wet application.
- Window coverings: raise blinds and shades or remove lightweight window treatments; installers will not move heavy draperies or furniture unless arranged ahead of time.
- Fragile items and electronics: remove breakables from sills and nearby shelves; unplug or cover electronics within splash range.
- Pets and kids: arrange a secure place for pets and children away from the work area for the full day.
- Provide a contact and keys: if you cannot be present, leave explicit permission and a phone number for the onsite lead.
Commercial and multi-tenant preparation
- Coordinate building services: reserve a loading zone, elevator time, and an interior staging room to reduce trips and interruptions.
- Floor protection and signage: request floor runners or temporary signage to protect tenant finishes and redirect foot traffic during work.
- Security and alarm systems: notify security and disable zone sensors if installers need to remove finishes; get written approval for any access changes.
- Tenant notification: provide one or two notifications to affected tenants with estimated start times and brief behavioral guidance, such as avoiding meeting rooms nearest the crew.
- After-hours work: if you need night or weekend installs, confirm lighting, restroom access, and overtime rates in advance.
Environment matters in practice. Aim for an interior workspace roughly 50 to 80 F and moderate humidity – high moisture makes adhesives slow to grab, very cold temperatures make films stiff. If your building cannot meet those conditions, expect delays or higher labor when installers need heaters or desiccants.
Trade-off to consider. You can hire installers to handle prep and move furniture, but that raises cost and liability. If you choose to prepare the site yourself, be realistic about moving heavy or fragile items; plan a mover for anything over 50 pounds.
Concrete example: A Salem storefront scheduled daytime tinting and avoided business disruption by arranging an off-street parking space for the crew, blocking a single bay for the scaffold, and posting a short notice to customers. The manager also arranged for the alarm vendor to temporarily bypass the front-zone sensor, which saved two hours of work and an unnecessary alarm call.
Verify access, parking, and a single on-site point of contact before the day of the install — this saves hours and prevents rescheduling.
Takeaway: lock down practical details first — access, staging, HVAC and alarm coordination, and who will be onsite. Without that, quotes are optimistic and schedules slip; with it, installations run on time and warranty documentation is clean.
5. What to expect on installation day: timeline, crew, and disruption
Straight answer: installation day is a sequence of concentrated tasks with predictable peaks — setup, surface prep, application bursts, heat forming/trimming, then cleanup and documentation — not a slow, continuous noise all day. Plan for focused activity around each window rather than constant disturbance in the whole house or building.
Typical timeline and crew composition
Small residential jobs: a two-person crew that arrives, stages, and finishes a living room or a set of kitchen windows in about 4 to 8 hours depending on pane size and curve. Whole houses with 15–30 panes normally fit into a single long workday; allow a buffer for unexpected cleaning or minor repairs. Commercial façades usually need 3–6 people, scaffolding or lifts, and phased scheduling across multiple days or nights.
- First 30–60 minutes: walkthrough, confirm final measurements, protect floors and furniture, and set up ladders or scaffolding.
- Next blocks (per-window): deep clean, wet-apply film, squeegee passes, heat-shrink if needed, trim and edge seal — expect 20–60 minutes per pane for standard glass; complex curved or safety films take longer.
- Final 30–90 minutes: inspection, photo documentation for warranty, light cleanup, and customer sign-off.
Disruption to expect: installers use water spray and slip solution (minor dampness on sills), squeegees, knives for trimming, and occasional heat guns. There will be short bursts of scraping or trimming noise; installers should lay down protection but you should expect temporary relocation of delicate items and restricted access to the immediate work zone.
Trade-off to plan for: scheduling outside regular hours reduces tenant interruption but increases labor rates and can complicate heat-forming work that depends on daytime temperatures. Exterior installs reduce interior disruption but introduce weather risk and often require extra lead time.
Concrete example: In a Southeast Portland condo we completed interior ceramic film on 10 tall, narrow windows. Two installers worked 6 hours; progress stalled for 45 minutes when hidden silicone residue required additional cleaning and a re-cut. The client had removed small decor items but not heavy drapes; removing those mid-job added 30 minutes and a modest fee. The job finished the same day once surfaces were properly prepped.
Practical insight: installers who quote a tight single-day schedule without carving out time for remediation or trim removal are optimistic. Expect 10–20 percent schedule slack on top of the quoted time.
Final judgment: treat the day as project work, not maintenance. Lock down access, confirm whether the crew will handle curtain or blind removal (get a line-item price), and insist on a short completion inspection before they leave. That one step prevents most of the problems that show up weeks later and protects warranty claims with a clean photo record. For local scheduling and service options see Tinting Oregon and technical standards at the IWFA.
6. Cost ranges, warranties, and local considerations in Oregon
Cost reality: installed price for window tint installation is not just film cost — labor, access, and certification drive the final figure. Low material prices can be erased by difficult access, scaffolding, or rework from poor surface prep, and warranty quality depends on who performs the install as much as which film you pick.
| Film category | Installed cost per ft² (typical) | When price rises |
|---|---|---|
| Entry-level solar control | 6 to 12 USD | Large panes, curved glass, or heavy surface cleaning |
| Premium ceramic / low-reflectance | 10 to 18 USD | Authorized branded products and multi-coat films |
| Safety and security films | 12 to 25 USD | Mechanical anchoring, thick multi-layer kits, or retrofit edge work |
| Exterior-grade films | 14 to 30 USD | Scaffold or lift rental, weather delays, stronger adhesives |
| Decorative / privacy films | 8 to 20 USD | Custom patterns, templating, and shop cutting |
Local cost drivers: Oregon adds practical line items you should expect: minimum job fees for small residential jobs, a mobile tint service surcharge for remote Bend and Central Oregon locations, and overtime or evening premiums for off-hours work in busy commercial corridors. Estimate requests should show material, labor, travel, and any scaffold or permit costs separately so you can compare apples to apples.
Warranty reality check: manufacturers such as 3M and LLumar will often offer limited or lifetime material warranties but only when installations are performed by authorized or certified dealers and the job is registered. Labor or workmanship warranties are provided by the installer and typically run from one to ten years. Exclusions commonly include exterior abrasion, film applied to failed insulating glass units, and installations where recommended environmental conditions were not met.
Documented proof of certified installation and registered warranty coverage is the single most important evidence when filing a claim — insist on a copy of the product warranty and proof of registration before final payment.
Concrete example: a Bend vacation home with west-facing glazing required a premium ceramic film to avoid exterior reflectivity and survive strong afternoon sun. The job cost more per square foot than a Portland interior-only install because the crew added a travel surcharge, used a higher-spec film rated for high UV, and registered the job with the manufacturer to secure a lifetime material warranty. The client accepted a 10 percent premium to avoid a probable mid-term re-coat in sunny Central Oregon conditions.
Practical judgment: most buyers obsess over the per-square-foot line without asking who will register the warranty, what the installer guarantees for workmanship, or how seasonal scheduling will affect cost. When comparing quotes, require separate line items for materials, labor, travel, and warranty registration, and ask to see the actual warranty document and installer certification. Next consideration: confirm any permit or historic-district approvals before signing so quotes do not exclude later-required removal or replacement.
7. Aftercare, maintenance, and troubleshooting common issues
Immediate rule: treat the newly applied film as a fragile finish until the installer signs off on curing. Avoid aggressive cleaning, rubbing at edges, or lowering blinds into contact with the film during the initial cure period — follow the product-specific window the installer gives you rather than guessing.
Cleaning method: use a soft microfiber, clean water, and a mild, non-ammonia detergent. Spritz solution onto the cloth, not directly onto the film, and blot rather than scrape. Do not use abrasive pads, razor scrapers, or household cleaners that list ammonia or strong solvents.
Maintenance and practical limits
Exterior care caveat: exterior or storefront films face abrasion and pollutants. Avoid pressure washing at close range; if pressure cleaning is necessary, use a low-pressure setting and keep the nozzle well away from the glass. When in doubt, ask your installer for the permitted pressure and nozzle distance for the specific film used.
- When you can clean: follow the installer or manufacturer interval — many films require a short no-clean period during curing, then routine gentle cleanings afterward.
- Routine cleaner choices: mild dish soap and water, or manufacturer-recommended window sprays that explicitly state non-ammonia formulation.
- Avoid: abrasive pads, solvent-based cleaners, and squeegees with hard edges pushed against film edges during the cure.
Troubleshooting the common faults
Small pinholes, minute bubbles, or a diffuse hazing are often trapped moisture or air and can shrink or disappear as the adhesive bonds. Larger domed bubbles, peeling at the edges, or sudden whitening that increases over days are signs of adhesion failure, contamination, or improper edge sealing and usually require installer intervention.
- Wait vs call: if defects are tiny and were photographed at handoff, wait through the curing window the installer gave you; if defects grow, appear at taped edges, or if the film lifts, call immediately.
- DIY fixes to avoid: do not try to puncture, re-squeegee, or heat a failing edge yourself — that can void warranty and make the repair larger.
- What the installer should do: re-clean edge, re-seal with manufacturer-approved sealant, or replace the panel under warranty if contamination or improper adhesion is confirmed.
Warranty and documentation: photograph every problem pane with timestamps, keep your invoice and the film product code, and insist the installer registers the job with the manufacturer. Claims fail more often from missing documentation than from product defects.
Real-world example: In a Portland townhouse minor speckled hazing appeared after install; the owner photographed it, agreed with the installer to watch it for ten days, and the hazing faded as trapped moisture evaporated. By contrast, a Salem storefront developed edge lift where silicone residue was missed during prep; that job was re-sealed and an entire sash reworked under the installer workmanship warranty.
Important: never clean or pressure-wash windows before the installer confirms the film has cured; premature cleaning is a common cause of edge lift and denied warranty claims.
8. Real world examples of installations in Oregon
Reality check: real window tint installation projects in Oregon are dominated by access constraints, film selection trade-offs, and local conditions more than by the brand name on the roll. Expect job notes about scaffolding, night work, and warranty registration to show up on estimates more often than glossy sample swatches.
Portland bungalow – balancing view with heat control
Residential example: A south-facing living room in Irvington received 3M Prestige ceramic film to reduce glare and UV while preserving daylight and street views. Two installers completed the interior application in a single day using wet-application and careful heat-shrink on tall panes; the homeowner kept blinds and sight lines intact. The practical trade-off here was paying a premium for a high-VLT ceramic film rather than choosing a darker dyed option that would have harmed the view without improving SHGC much.
Salem storefront – tenant comfort and operational coordination
Commercial example: A busy State Street storefront needed LLumar SelectPro solar control across a continuous glass facade. The install required evening scaffold work to avoid disrupting tenants, staged material registration to preserve the manufacturer lifetime warranty, and floor protection inside for high foot traffic. The on-the-ground lesson: commercial window film jobs are logistical projects – permits, elevator reservations, and tenant notices often drive cost and schedule more than the film itself.
Eugene duplex – security film with constrained reveals
Multi-family example: Ground-floor windows at a duplex near the university were retrofitted with an 8 mil Madico safety film after repeated break-ins. Narrow sash reveals and uneven glass edges forced shop templating and inside installation with aggressive edge sealing rather than exterior anchoring. This shows a common constraint: physical reveal dimensions and existing trim often determine whether a safety system can be mechanically anchored – and that can double labor time.
Bend vacation home – high UV, low exterior reflectivity
Vacation property example: A Bend mountain home with wide west exposures used Vista Solar Control film to cut solar heat gain without producing reflective glare that would spoil the view or trigger HOA complaints. The job included a mobile tint service surcharge, higher-spec UV-rated film, and manufacturer registration to protect against accelerated UV degradation in Central Oregon. Practical insight – remote installs cost more up front but avoid mid-life re-coats in high-UV environments.
A common misunderstanding is that the same film performs identically across sites. In practice installers often change attachment, edge sealant, and curing procedures between Portland and Bend because of different UV loads, temperature swings, and wind-driven dirt. That procedural change determines long-term durability as much as the film choice.
If your project is remote, commercial, or involves safety film, insist that the quote shows scaffold/lift, travel or mobile tint service charges, and warranty registration as separate line items.