Shatter-Resistant Window Film: How It Protects Against Impact and Accidents
Broken glass is a common source of injury and costly damage, and shatter resistant window film changes that outcome by holding fragments in place and delaying breaches. This article explains how these films work at the material level, compares thicknesses and real-world use cases, decodes the standards and test claims that matter, and shows why professional installation and anchoring significantly affect performance. If you manage a home or commercial property in Portland, Salem, Eugene, or Bend, you will get practical guidance on choosing, installing, and budgeting for the right solution, including what to expect from a local installer such as Tinting Oregon.
How shatter-resistant window film works at a material level
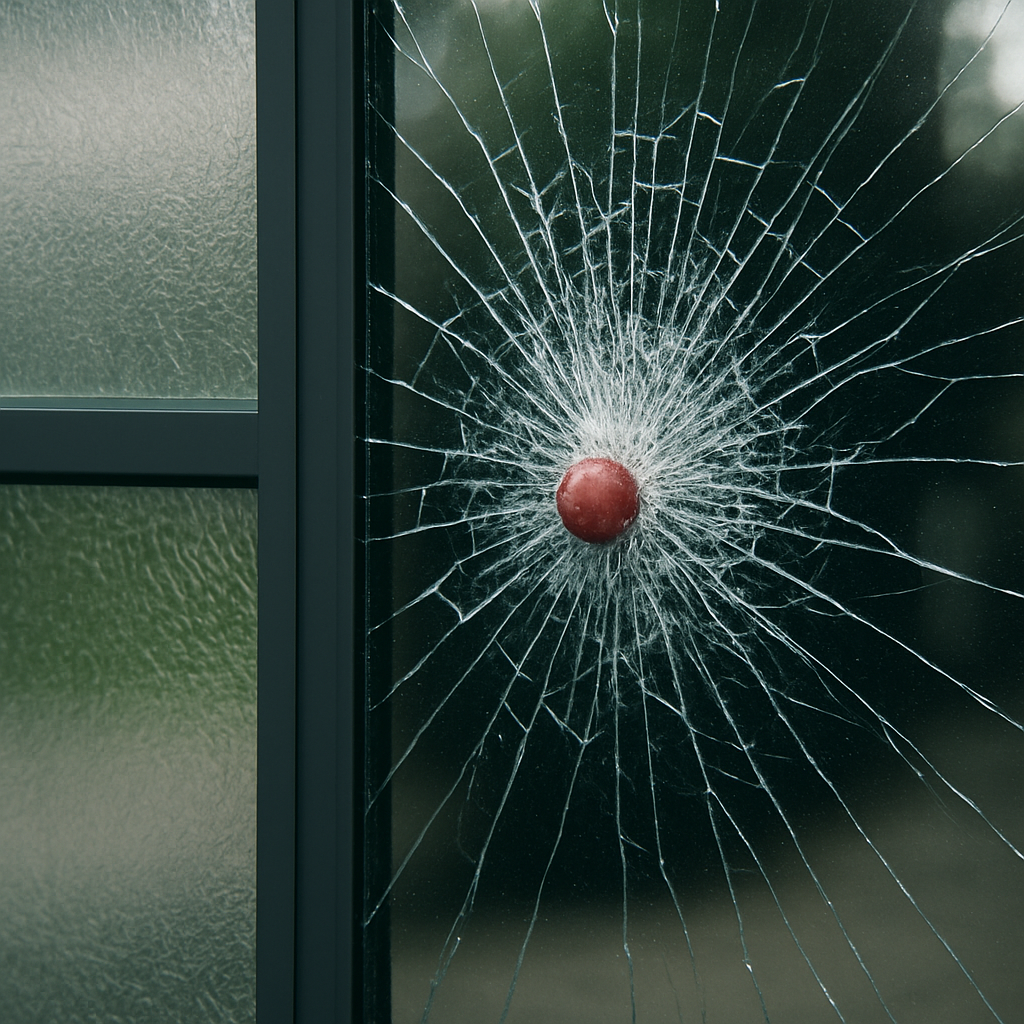
Material action is simple to state and more subtle in practice: the film does not make glass unbreakable — it turns a brittle, flying hazard into a retained panel that stays largely in place. That outcome depends on three cooperating parts: the polymeric film body, a high-bond adhesive layer, and how the film is terminated at the glass edges.
Layer-by-layer: what each component actually does
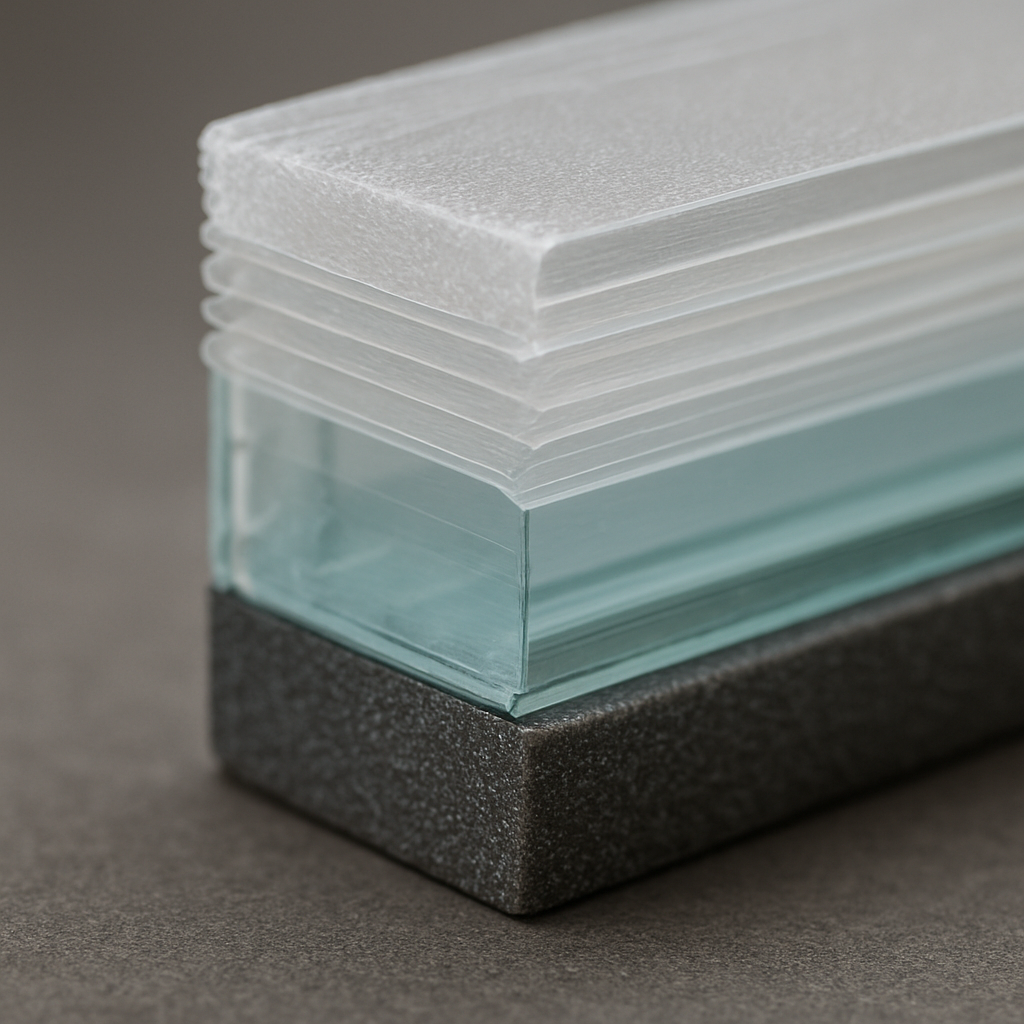
Scratch coating and polyester layers: most shatter resistant window film uses one or more layers of stretched polyester (PET). PET carries tensile load after the glass fractures — it spreads impact forces across the pane instead of letting a single crack run. Thicker PET stacks increase energy absorption but raise optical and thermal management trade-offs.
High-bond adhesive and primers: the adhesive is the invisible workhorse. A high-performance adhesive keeps fragments stuck to the film, transfers shear forces into the frame, and prevents spall. Cheap adhesives delaminate under shock or humidity; that is where many DIY kits fail compared with factory-engineered systems like those from major manufacturers. See manufacturer tech pages such as 3M Safety and Security Films for adhesive test data.
Edge treatment and optional laminates: without proper edge sealing or mechanical anchoring, even a thick film can peel away at the perimeter. For true forced-entry or blast resistance, films are paired with perimeter systems – structural silicone, mechanical channels, or laminated interlayers similar to the ones used in laminated glass. That connection to the frame is often the difference between held glass and a dropped pane.
- Practical limitation: thicker films improve retention and delay penetration but increase risk of thermal stress on heat-treated or low-e glass — always verify compatibility before selecting heavier films.
- Performance trade-off: clear, optically excellent films exist, but as thickness goes up you may see more edge visibility and potential slight distortion; choose the minimum thickness that meets the risk profile.
Concrete example: A downtown Portland retail tenant installed an 8 mil clear safety film with professional edge sealing after repeated smash-and-grab attempts. When a later breakage occurred the film held shards against the frame, prevented entry, and limited replacement to the outer lite instead of a full storefront rebuild. That outcome saved several thousand dollars and hours of downtime.
Judgment that matters: people often assume any visible film equals security. In practice, the adhesive chemistry and termination method matter as much as thickness. If you need more than fragment retention — for example, to delay a forced entry — ask for test reports tied to standards and insist on perimeter anchoring.
Key point: film + adhesive + edge termination = real retention. Skip any one and the system underperforms.
Next consideration: when evaluating options with Tinting Oregon, ask for the adhesive tech sheet and a description of the proposed edge treatment; those two items tell you more about real-world performance than marketing names alone.
Performance metrics and industry standards that matter
Standards separate marketing from measurable performance. When a vendor says a film is impact resistant, you need to know which test they passed and under what conditions; that determines whether the film reduces laceration risk, delays forced entry, or stands up to blast pressures.
Human-impact and safety glazing rules: ANSI Z97.1 and CPSC 16 CFR 1201 are the go-to standards for safety glazing — they test whether broken glass will stay in place or release dangerous shards under human-impact scenarios. Passing these standards means the product reduces injury risk in everyday accidents, but it does not certify the film for blast or deliberate break-in resistance.
Blast and dynamic-load tests are different animals. ASTM E1886 and E1996 evaluate assemblies under blast and missile impact conditions and intentionally measure how the entire glazed assembly behaves under transient loads. These tests assume a specific framing and anchoring method; a film-only pass on a loose frame in the field will not reproduce lab results. For an overview of assembly-level requirements see the DesignGuide.pdf target=_blank>GSA Glazing Design Guide.
Forced-entry and penetration tests are often proprietary. Manufacturers may publish timed forced-entry or tool-attack reports, but those tests vary widely by procedure and mounting. Treat such claims as directional unless the report shows the exact test method, substrate, frame, and anchoring used.
What these standards mean in practice
Practical insight: meet the standard that matches the threat, not the snappiest label. ANSI/CPSC is appropriate for residential windows and places where reducing injury from accidental breakage is the goal. For storefronts facing smash-and-grab risk or buildings in seismic or blast-exposed areas, insist on assembly-level testing such as ASTM E1886/E1996 or documented forced-entry test results plus perimeter anchoring.
Concrete example: A public elementary school in Eugene specified films that meet ANSI Z97.1 after a site review. The project reduced laceration exposure around play areas and satisfied the district's safety glazing policy without requiring full window replacement. The films chosen were clear, optically good, and documented by the manufacturer for the ANSI test.
- What to request from any vendor: a copy of the test report showing the standard name, test method, specimen description (glass type and thickness), and the mounting used.
- Ask for installation protocol: how the film will be terminated at the perimeter, whether edge sealants or mechanical channels are part of the system, and whether the installer is certified by the manufacturer.
- Look for assembly-level data: if the risk involves forced entry or blast, require an assembly test or a field mockup; film-only data is insufficient.
Important: a lab pass on a film sample does not guarantee the same result in your window unless the mounting and edge treatment match the tested assembly.
Judgment that matters: the industry mistake is treating film as a standalone component. Real protection is an assembly-level outcome — film, adhesive, glass type, frame condition, and anchoring working together. Prioritize documented assemblies and certified installation over brand buzzwords.
Next consideration: when you contact Tinting Oregon for a quote, ask for the specific test reports that match your threat profile and request a site mockup or documentation of the framed assembly we will install; that is the only reliable way to translate a test result into field performance. See our commercial services at Tinting Oregon Commercial Window Tinting.
Types of shatter-resistant films and recommended use cases
Start with the risk you actually face, not the thickest film on the menu. Film types cluster around three practical families: light safety films for injury reduction, heavier security films for forced-entry delay, and engineered laminated or anchored systems for high-threat or blast scenarios.
Quick categories and when to use each
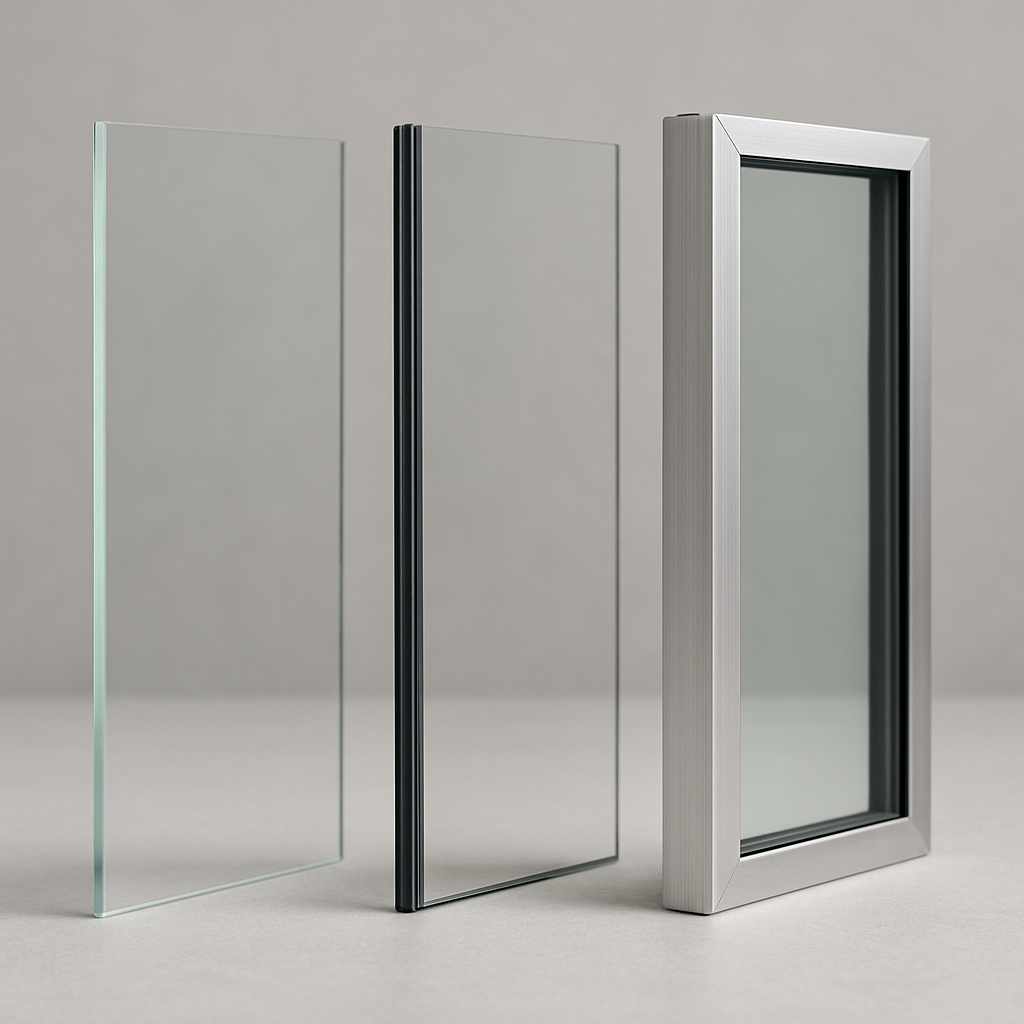
| Film category | Typical thickness range | Common use cases | Primary trade-offs |
|---|---|---|---|
| Clear safety films | 4 to 7 mil | Residential windows, interior glazing, sliding doors where laceration risk is the chief concern | Low visual impact but limited forced-entry resistance; suitable for homes wanting minimal appearance change |
| Security films | 8 to 12 mil | Retail storefronts, schools, small commercial façades, ground-floor offices | Better delay against smash-and-grab; may show slight edge visibility and need careful mounting |
| Heavy security and anchored systems | 12 mil and above or film plus mechanical anchoring | High-risk retail, banks, critical facilities, blast or forced-entry mitigation projects | Higher cost, can require perimeter channels or structural silicone; may need glass/frame assessment for thermal stress |
| Specialty films (tinted, solar control, anti-graffiti, ballistic) | Variable | When combined benefits are needed – solar control plus safety, privacy plus retention, or extreme threat protection | Tint and solar films change appearance and thermal behavior; ballistic films are niche and expensive |
Practical insight: thickness is only one variable. Adhesive quality, optical clarity, edge termination, and whether the system is mechanically anchored shape real-world performance far more than mil number alone. In many retrofit cases a well-terminated 8 mil system with perimeter seal or channel outperforms a loosely applied 12 mil film.
- When to choose clear safety films: homes with children, interior doors, or patio doors where reducing cuts and ejection is the goal.
- When security films make sense: storefronts and ground-floor glazing with theft risk, or public buildings that need to slow entry while police respond.
- When anchored or laminated systems are required: sites with documented forced-entry attempts, buildings in high blast-threat zones, or installations where insurance or code demands assembly-level performance.
Concrete example: A Bend homeowner applied an 8 mil clear safety film plus edge seal after a windstorm broke a second-story bedroom window. The film held broken glass to the frame, prevented shards from falling onto the patio below, and allowed replacement of only the outer pane instead of a full frame rebuild. The homeowner avoided an insurance claim and weeks of invasive repairs.
Judgment you will not see on marketing pages: many buyers default to the thickest film thinking it equals security. That often increases cost and thermal risk without proportional gain. For most residential and light commercial needs, choose the film that matches the threat and pair it with correct edge termination or anchoring.
Important: if your priority is forced-entry delay or blast mitigation, demand assembly-level test data and a description of the anchoring method before you buy.
Action to take: during your site survey have Tinting Oregon confirm glass type, frame condition, and the exact threat to match film category and termination method to the job. That step is the single best way to avoid overpaying for unnecessary thickness or under-specing the system.
Real-world applications and case examples
Field result that matters: when properly selected and installed, shatter resistant window film turns broken glazing into a manageable maintenance event rather than a safety emergency. The measurable outcomes property owners care about are fewer lacerations, smaller replacement scopes, and less downtime for businesses.
Concrete applications
Retail storefronts: a midtown Salem boutique replaced plain glass with a heavy clear security film and installed aluminum edge channels after a sequence of break-ins. The next attempted smash-and-grab left the outer lite fractured but retained against the channel, preventing a quick entry and giving staff time to call law enforcement. Result: no stock loss overnight and a much lower repair bill than full-frame replacement.
Multifamily common areas: a Portland apartment building used a 7 mil safety film on a lobby curtainwall adjacent to a playground. When a runaway skateboard struck the glass, the film prevented shards from spraying into the entry path. Management avoided tenant injury claims and deferred full-glass replacement until planned renovations, saving cash flow and avoiding a temporary closure.
Hospital and school retrofits: institutions frequently pick clear safety films that meet ANSI Z97.1 to reduce laceration risk around patient rooms and cafeterias. In practice these films lower first aid incidents and keep lines of sight intact while meeting facility safety policies without the expense of replacing glazing with laminated safety glass.
Practical tradeoff to plan for: film reduces flying shards but does not guarantee intrusion prevention by itself. If the site threat is determined forced entry, a film-only upgrade without perimeter anchoring will only delay an attacker for a short time. For that scenario budget for mechanical edge retention or structural silicone so the lab performance can be reproduced in the field.
What success looks like: limited repair scope, quick return to normal operations, and documented test data tied to the installed assembly. If an installer cannot show the test report for the proposed film and explain the anchoring method, you should treat their performance claims as unverified.
Important: ask for assembly-level documentation and a site mockup. A manufacturer spec sheet alone is not enough to predict field performance.
Next consideration: before you buy, have a certified installer inspect glass type and frame condition and request a written proposal that ties the chosen film to the test reports and the proposed anchoring method. To schedule a site assessment, contact Tinting Oregon and ask for examples of similar local projects.
Installation factors that determine performance
Installation quality, edge termination, and site conditions usually decide whether a shatter resistant window film works in the field. The film itself matters, but if the adhesive, edge treatment, or mounting are wrong, you get cosmetic retention at best and failure under load.
Surface preparation and application controls
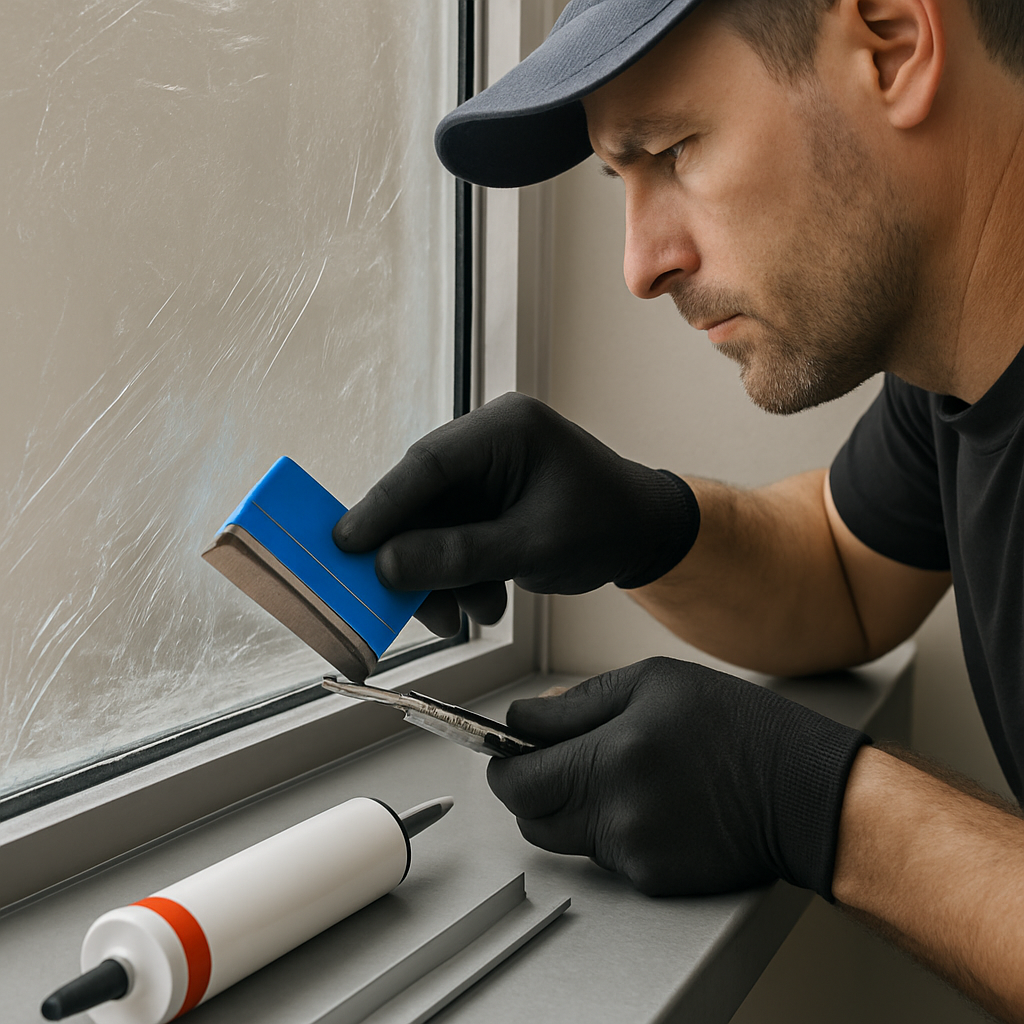
Proper performance begins before the film touches the glass. A thorough inspection removes loose sealant, paint nibs, and silicone smears that break adhesion. Application technique – correct cutting, a controlled wet-solution mix, consistent squeegeeing strokes, and careful edge trimming – determines whether the adhesive wets out evenly or traps pockets of moisture that later cause lifting.
Perimeter termination and anchoring – practical trade-offs
There are three common termination approaches: adhesive edge seal (discreet, lower cost), structural silicone or high-bond tape (moderate visibility, strong), and mechanical channels or clips (most robust but invasive). Trade-off: channels give the best assembly-level resilience for forced-entry or blast scenarios but change the appearance and may require frame modification – a poor choice for historic windows. For residential safety goals a well-executed adhesive edge seal often gives the best balance of performance and appearance.
Field conditions, glass compatibility, and cure
Adhesive cure and film behavior are sensitive to temperature, humidity, and solar loading. In rainy, cool Portland winters adhesives cure slowly and water migration to the edges is a real failure mode. In Central Oregon sun and low humidity can accelerate drying and trap solvent, causing bubbles. Practical consideration: installers should schedule work during a suitable weather window and select adhesives rated for the local conditions.
Limitations to plan for: heavier films increase retention but also raise thermal-stress risk on tempered or heat-strengthened glass. If the site has low-e coatings or heat-treated lites, verify compatibility or choose mid-weight films with low solar absorption to reduce the chance of spontaneous edge cracks.
Concrete example: A midtown Salem restaurant attempted a weekend DIY install with a heavy clear film. After a few months of rain and temperature swings the edges began to blister and peel where the film met old glazing compound. A professional crew later removed the failed film, prepared the substrate, installed a properly-sized film with structural edge sealant and a partial channel on the busiest facades, and eliminated repeat failures. The professional fix cost more up front but avoided monthly patch repairs and business disruption.
Verification steps matter. Insist on a site mockup, before-and-after photos, an adhesion test on a discreet panel, and written documentation of the termination method. Manufacturer warranties for film integrity are often conditional on certified installer application and specific edge treatments – get those conditions in writing.
Important: a quote that lists film mil and price but does not describe how edges will be terminated or whether anchoring is recommended is incomplete and should be treated as provisional.
Next consideration: during your site survey with Tinting Oregon ask for a written assembly description and a local-weather installation plan – that single document tells you whether the quoted system will actually reproduce lab performance in your windows. Request a free assessment at our contact page.
Costs, warranties, and expected lifespan
Straight cost reality: installed shatter resistant window film typically runs in clear bands depending on performance and anchoring. Expect roughly $3–8 per sq ft for basic residential safety films, $8–20 per sq ft for heavier commercial security films, and substantially more for assemblies that include mechanical channels or structural anchoring. Final price depends on film thickness, glass geometry, edge treatment, and access difficulty.
Trade-off to accept: cheaper installed prices usually mean thinner film, simpler adhesive edge seals, or a non-certified installer. That saves money up front but reduces the chance a lab test or manufacturer warranty actually translates to field performance under real stress or attempted forced entry.
- What raises costs: odd-shaped panes, multi-lite storefronts, required mechanical channels, high-rise rigging, and scheduling around weather windows.
- What lowers costs: standard-size residential windows, clear films without channels, and bundling multiple windows in one job.
Warranty distinctions matter more than length. Manufacturer warranties cover film defects such as excessive fading, adhesive yellowing, and delamination under specified conditions. Installer workmanship warranties cover application errors like poor edge sealing or premature lifting. Many manufacturer warranties require certified installation and stipulate approved edge treatments – if you skip the certified installer the warranty can be voided.
- Warranty checklist to demand in writing: coverage scope (what is and is not covered), warranty term in years, conditions that void coverage, whether the warranty is transferable, and any required maintenance steps.
Real-world example: A Portland boutique replaced its storefront with an 8 mil security film and aluminum perimeter channels. Installed cost landed near the mid commercial range. Two months later a smash attempt fractured the outer lite; the film and channel held, the repair required only a single-pane replacement, and the owner avoided a full-frame rebuild. The manufacturer replaced the failed outer pane under film warranty terms while the installer honored a one-year workmanship guarantee on the channel installation.
Lifespan and maintenance: expect effective service life typically between 10 and 20 years for quality films in temperate climates, with variability from orientation, sun exposure, and cleaning regimes. UV reduction helps slow edge degradation, but thermal stress, ammonia-based cleaners, and mechanical abrasion are common failure accelerants.
Practical judgment: evaluate total lifecycle cost, not just installed price. A properly specified mid-weight film with perimeter termination usually costs more up front but reduces replacement and liability expenses over time compared with repeated cheap fixes or full glass replacement after an event. For commercial projects, documentation of warranties and test reports is often required by insurers.
Important: do not accept a quote that lists only film mil and price. Insist on a written warranty breakdown and a description of edge termination or anchoring before you sign.
Next consideration: when you request a site survey from Tinting Oregon bring window measurements and ask for a written price breakdown that separates film, edge termination, and labor so you can compare lifecycle cost and warranty conditions across bids.
Regulatory, code, and insurance considerations in Oregon
Start here: regulators and insurers judge the installed assembly, not the film roll. Building officials, code language, and underwriters look for documented performance of the glazing as fitted into its frame. That distinction is the single practical reason a lab certificate without a described mounting method is often useless in the real world.
Local code reality: Oregon adopts model building codes with state amendments that require safety glazing in defined hazardous locations. Retrofit film may be accepted in some existing windows but is frequently not considered equivalent to replacing with tempered or laminated safety glass for code-mandated conditions, particularly where egress, stairways, or guards are involved. Before ordering work, get the local building official to confirm whether a retrofit film solution will satisfy the applicable requirement.
How to make a retrofit acceptable to officials and insurers
Documentation you will need: present an assembly description that pairs the film test report to the actual glass type, frame condition, and edge termination method. Include the manufacturer test report naming the standard (for example ANSI Z97.1 or the CPSC references), the installer certification, and a photo of the proposed termination detail. Without those items most plan reviewers and risk managers treat the claim as unproven.
Practical limitation and trade-off: even if a film passes ANSI or CPSC impact tests, some code officials still require full glass replacement in situations that affect structural safety or egress. The trade-off is simple: retrofitting preserves original framing and is cheaper and less disruptive, but it sometimes fails to meet replacement-spec requirements—plan for a permit review and budget the possibility of full-pane replacement.
Insurance nuance: insurers frequently support security upgrades but do not treat all measures equally. Expect them to ask for invoice copies, the film test report, and proof of installation method. For commercial storefronts many carriers will only consider a premium adjustment if the system includes documented perimeter retention such as structural silicone or mechanical channels; a glued-only retrofit often triggers only partial recognition.
Concrete example: A downtown Portland retailer sought a lower rate after installing a mid-weight security film. The insurer conditioned the change on receiving the installer certification, photos of the aluminum channel detail, and the manufacturer forced-entry report that matched the channeled assembly. Once supplied, the insurer updated the file and provided a modest credit on the risk, but only after the documentation proved the installed assembly matched the tested configuration.
Historic and landmark properties: preservation commissions commonly insist on reversible treatments and minimal frame alteration. In practice that means favoring well-documented adhesive-edge systems and mockups over visible channels, or getting conditional approval for a discreet channel that preserves character. Expect a formal review and allow lead time to get a decision from the local landmarks body.

If you want help navigating permit language or compiling the package insurers expect, Tinting Oregon prepares the required test reports, installation diagrams, and photo documentation as part of our site surveys. Bring the local code reference or insurer contact when we visit so we can assemble the exact evidence they will accept; that step saves time and prevents surprise rework.
How to choose the right film and next steps with Tinting Oregon
Start with the actual threat, not the thickest roll in the catalog. Choosing the right shatter resistant window film is a matter of matching threat, glass type, and mounting method. A mid-weight clear film with proper perimeter termination often delivers better real-world protection than an over-thick film that is poorly anchored or incompatible with heat-treated glass.
What Tinting Oregon checks on a site visit
Key inspection items include glass construction (annealed, tempered, laminated), unit size and muntin layout, frame strength and fastener condition, existing sealant or glazing compound, solar orientation, and any low-e or heat-treated coatings that affect thermal behavior. These details determine whether a solution should be a clear safety film, a heavier security film, or a film plus mechanical channel.
Practical tradeoff to accept: thicker films increase retention but also raise thermal-stress and visibility tradeoffs and usually increase installation complexity. If the primary need is injury reduction or UV protection, a clear 4 to 8 mil film professionally terminated will usually outperform a DIY heavy film that lifts at the edges.
Concrete example: A Portland homeowner had a second-story pane crack from hail. Tinting Oregon performed a site check, confirmed the pane was annealed single-lite glass, and recommended an 8 mil clear safety film with adhesive edge seal rather than a channeled retrofit. After installation the broken glass remained retained during a later wind event, repair was limited to a single lite, and the owner avoided a full-frame replacement and extended downtime.
Practical next steps to get a reliable proposal
- Prepare basic project info: photographs of each elevation, approximate window sizes, and any past glazing reports or insurance notes.
- Schedule a site survey: Tinting Oregon will measure, test glass where needed, and recommend film thickness, adhesive system, and whether mechanical anchoring is required.
- Review a written proposal: insist the quote itemizes film, edge termination, labor, lead time, and warranty conditions instead of a single line item price.
- Request verification documents: ask for manufacturer test report references, installer certification, and a short description or photo of the proposed termination detail.
- Approve a mockup or sample panel where appropriate: for commercial storefronts or historic windows a small field mockup proves compatibility before full rollout.
If a vendor will not show the test report or describe how the film will be terminated at the edge, their claim of impact resistance is not provable for your windows.
Final judgment: for most residential and small commercial projects the best value is a professionally specified system – correct film, proper adhesive, and a documented termination method – not the highest mil number. Contact Tinting Oregon for a no-obligation site assessment and a written proposal at Contact Tinting Oregon.