
If you are searching for office window tinting near me, what matters is less the lowest bid than correct film selection, certified installation, and enforceable warranties. This guide gives a short, practical checklist of the exact questions to ask about credentials, film performance metrics, installation logistics, warranties, and local incentives so you can compare quotes like a pro. It also highlights Oregon-specific issues for Portland, Salem, Eugene, and Bend so you can shortlist vendors with confidence.
Why ask detailed questions before hiring a commercial window tinting installer in Oregon
Key point: Surface appearances and a low bid hide the two things that actually control outcomes: correct film selection for the glass and how competently the installer executes the work. Get those wrong and the project delivers poor glare control, reduced daylight, warranty headaches, or even glass stress problems that are expensive to fix.
Technical vs. craft: Performance numbers like VLT and SHGC matter, but they only predict results when matched to the building elevation, glass construction (single pane vs insulated IGU vs tempered), and local solar angles. Installation details — edge preparation, adhesive handling, and how seams are finished — determine whether the film meets the promised performance or bubbles and peels within months.
What thorough questions uncover
- Risk exposure: whether warranties cover product defects only or also installer workmanship and transfer on sale
- Fit for glass: if the chosen film is suitable for IGUs and tempered glass and whether the installer has documented test installs
- Operational impact: staging, access equipment, daytime closures, and how tenant disruption will be minimized
- Energy and incentives: whether the installer can produce NFRC lab data and help access Energy Trust of Oregon rebates or measurement services
Concrete example: A downtown Portland office with strong west glazing accepted a cheap reflective film to cut glare. The windows later created distracting exterior glare for adjacent streets and offered poor UV protection; the installer was not certified by the manufacturer, so warranty support was limited. A small pilot and asking for manufacturer-authorized credentials would have exposed both issues before a full roll-out.
Practical trade-off to accept: higher-performance ceramic films preserve daylight while lowering heat gain but cost more up front; lower VLT metallic films give quick glare relief yet can create reflectivity complaints and may age faster near coastal exposure. Choose based on façade orientation and occupant priorities, not on which film the lowest bidder happens to stock.
Ask for one sample warranty document, one NFRC or lab report, and a pilot install on a representative window before signing a full contract.
Next consideration: When you shortlist vendors, require a site assessment and a written justification for the chosen film. If you want a local, documented option for a site visit and demo, contact Tinting Oregon to request project references and sample warranties.
Credentials and track record to verify for any local installer
Credentials are your primary risk control. A contractor who can show paperwork, repeatable projects, and manufacturer backing reduces the chance that a cheap install turns into a warranty dispute or a tenant complaint you inherit later.
What to verify and how it protects your project
Think of each document as an answer to a single risk: will the film perform, will the installer have insurance if something goes wrong, and will the manufacturer stand behind the product? Don't accept verbal assurances. Ask for verifiable proof you can check quickly.
| Document or proof | What to check and why |
|---|---|
| Business license and active local registration | Confirm the company is legally allowed to operate in your city – this matters for contracting and permits. |
| Certificate of insurance – GL and workers comp | Match policy dates and limits to your requirements; request the installer list you as additional insured for the job. |
| Manufacturer authorizations or dealer listing | Use manufacturer locators (for example 3M) to verify training, not just a printed logo. |
| Three recent, commercial Oregon references with photos | Contact names and photos let you confirm similar glass types, elevations, and long term appearance. |
| Sample manufacturer and installer warranties | Read exclusions, transferability, and registration requirements before you sign a contract. |
Practical tradeoff: deep manufacturer certification is valuable but not sufficient. A crew can hold a certificate yet lack experience on specific glass types like laminated IGUs or high-elevation installs. Prioritize vendors who can show completed projects that match your building geometry and climate exposure.
Concrete example: A Salem property manager accepted an installer that showed a manufacturer logo but could not provide contactable Oregon references. After installation, edge delamination appeared on several insulated units. The manufacturer limited coverage because the installer had not registered the job correctly. Verifying registration processes and speaking with local references would have prevented the cost and downtime.
When comparing bidders, give extra weight to installers who: document past projects in Portland, Salem, Eugene, or Bend; can explain how their work handled local permit or access issues; and who assist with incentive paperwork from Energy Trust of Oregon. Local track record matters more than marketing claims.
Questions to evaluate film performance and product selection
Start with the glass, not the sticker. The single most important step is confirming the film you are quoted is compatible with your exact glazing assembly and performance goals — and that the quoted performance numbers reflect installed conditions, not just a lab sample.
Technical questions to put on your RFP
- Product identification: Which manufacturer and exact product code will you install, and can you attach the manufacturer technical data sheet for that SKU?
- Spectral data: Can you provide the spectral transmission curve (visible + NIR) so we can verify spectral selectivity — high visible transmission with strong NIR rejection preserves daylight while cutting heat?
- Installation vs. lab data: Is the quoted SHGC/VLT from an NFRC label, independent lab test, or manufacturer internal test? Ask the vendor to explain any differences between center-of-glass lab numbers and expected field performance.
- Visible reflectance: What are the interior and exterior visible reflectance percentages? Some low VLT metallic films cure glare problems for occupants but create unacceptable exterior reflectivity in urban settings.
- Compatibility checklist: Is this film approved for IGUs, tempered glass, and low-e coatings? If not, what test installs or manufacturer waivers are provided?
- Film construction details: What is the film thickness, adhesive type, and edge-seal recommendation? Thinner films may cut cost but age faster at edges, especially on coastal exposure.
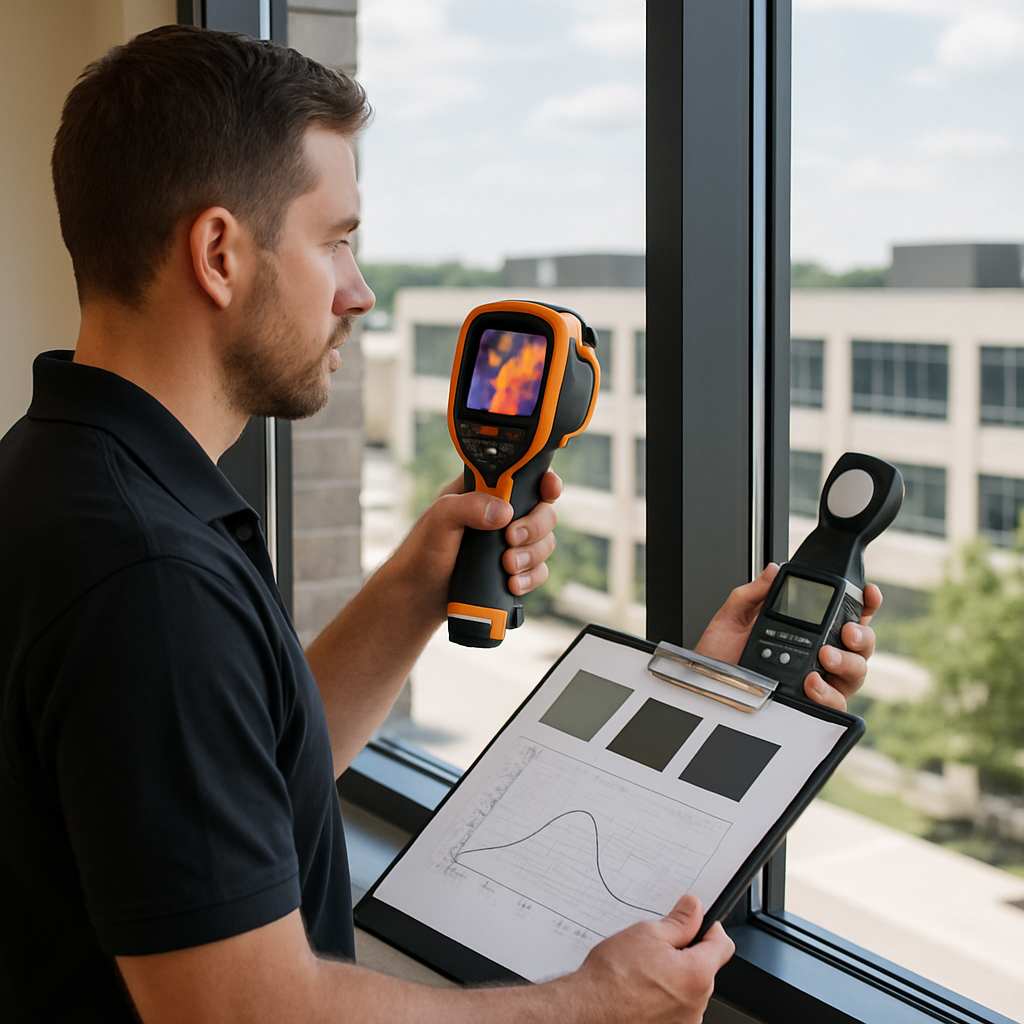
- Performance verification: Do you include a post-install verification plan — light meter and/or thermal camera readings and a short report?
- Longevity risks: What are the known failure modes for this product in Pacific Northwest climates — color shift, delamination, edge lift — and how will they be prevented?
Trade-off to weigh: A film that gives the lowest SHGC will reduce summer cooling but may eliminate passive solar gain in winter, increasing heating demand on over-glazed southern façades. In Oregon that trade-off matters more in Bend and inland sites than coastal Portland. Ask vendors to run a simple seasonal energy sketch showing how proposed SHGC changes affect annual HVAC load.
Concrete example: A Portland marketing office needed glare control without dimming daylight for collaborative zones. The winning solution was a spectrally selective ceramic film with VLT ~60% and strong NIR rejection; a pilot window measured a 35% drop in surface temperatures using a thermal camera and tenants reported no loss of perceived brightness. The vendor documented the spectral curve and delivered an NFRC label for the installed product.
Practical judgment: Many bidders will quote attractive SHGC numbers but cannot produce spectral curves or confirm compatibility with low-e IGUs. If an installer cannot show both spectral data and a signed manufacturer compatibility statement for your glass type, treat the proposal as incomplete — that gap predicts warranty friction or rework.
Demand spectral curves, NFRC/independent test references, and a manufacturer compatibility signoff before you accept a product selection.
Warranty, testing, and product liability questions to ask
Warranties and test records are where theoretical performance becomes enforceable responsibility. If you want a fix when something goes wrong — bubbling, edge lift, color shift, or unexpected glass stress — the contract language and documented test evidence are what make that outcome recoverable rather than a vendor promise you cannot cash.
Core documents to demand before you sign
Insist on hard copies of three things: the manufacturer's full warranty document for the exact SKU, the installer's workmanship warranty (not a one-sentence pledge), and the manufacturer compatibility statement for your glass type. If any of those documents is missing or conditional on installer registration, make the registration a precondition in the contract.
- Product warranty specifics: What remedies are offered (repair, replacement, pro-rated credit), warranty duration, transferability on sale, and critical exclusions such as edge moisture, chemical exposure, or coastal corrosion.
- Installer workmanship warranty: Exact time period, scope of coverage, response time for repairs, and whether the installer will act as your first point of contact for manufacturer claims.
- Registration and activation: Who registers the job with the manufacturer, within what timeframe, and what documentation proves registration (keep the confirmation number).
- Compatibility and testing: Ask for an explicit manufacturer signoff for IGUs, tempered glass, and low-e coatings, plus any thermal stress or adhesion test reports done on a sample unit.
- Independent lab data: Request NFRC labels or independent lab reports for SHGC, VLT, and UV rejection and ask for an interpretation of how those numbers map to your elevations.
- Installation constraints: Required temperature/humidity windows, recommended edge clearance or dye-cutting practices, and any cooling/heating season restrictions that affect warranty validity.
- Liability for glass breakage: Who pays if a film-induced thermal stress event cracks a pane? Get this in writing and confirm insurance covers replacement and consequential damages.
- Failure modes and remedies: For common Pacific Northwest issues (edge delamination, adhesive staining), what is the documented remediation path and expected timeline?
- Recordkeeping: Will the installer record batch/lot numbers, install date, and photos and deliver them to you? These are essential if a warranty claim is later disputed.
- Dispute process: Is warranty enforcement handled directly with the manufacturer, routed through the installer, or subject to binding arbitration? Prefer clear, court-enforceable remedies.
Practical tradeoff: A long manufacturer warranty looks good on paper but may be tightly conditional or payable only as product credit. Installer-backed workmanship coverage with a defined response SLA is often the faster, more useful protection for occupied offices.
Concrete example: In a midrise Portland office the owner discovered edge delamination six months after install. The manufacturer refused coverage because the job had not been registered within the required 30-day window and the installer had not recorded batch numbers. Because the contract required the installer to perform registration and maintain records, the installer accepted responsibility and paid for a corrective replacement — a costly but enforceable outcome for the owner.
Judgment you should apply: Do not accept warranty language that requires the owner to do registration, testing, or pilot installs without the installer's written commitment to perform and document those actions. In practice, that clause shifts a routine operational task onto you and becomes the easiest reason for a warranty denial.
Require the installer to deliver: sample warranty PDF, manufacturer compatibility letter, NFRC or lab reports, and a signed install registration confirmation before cutting film or scheduling work.
Project scope, installation process, and logistics to clarify up front
Clear scope prevents scope creep. Define exactly which elevations, which panes, and which film SKU will be installed before anyone orders material or schedules a crew. Vague scopes lead to mid‑project change orders, extra lift costs, and disputes about who pays for blind removal, patching, or rework.
Who does what matters as much as what gets done. Put responsibility for permits, scaffold rental, lift operators, and manufacturer registration in the contract. If the installer expects you to handle permits or remove blinds, make that explicit and price the labor or tenant coordination time.
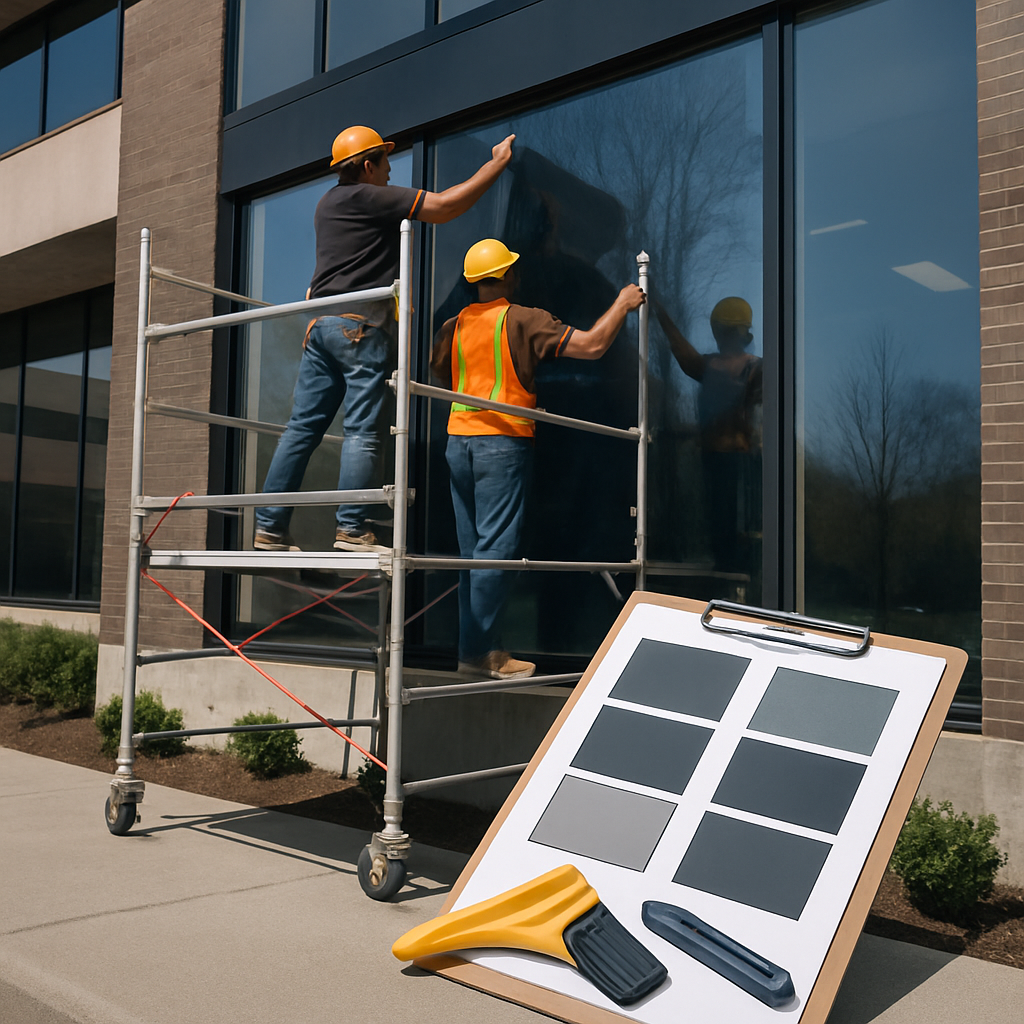
Installation workflow you should require in the proposal
- Pre‑install survey and digital record: measured drawings, photos of glass edge conditions, glass manufacturer markings, and a labelled elevation map so quotes align with reality.
- Material confirmation and mockup: commit the exact SKU per elevation and require a small, scheduled mockup (test patch) on a representative pane with before/after light and surface temperature photos.
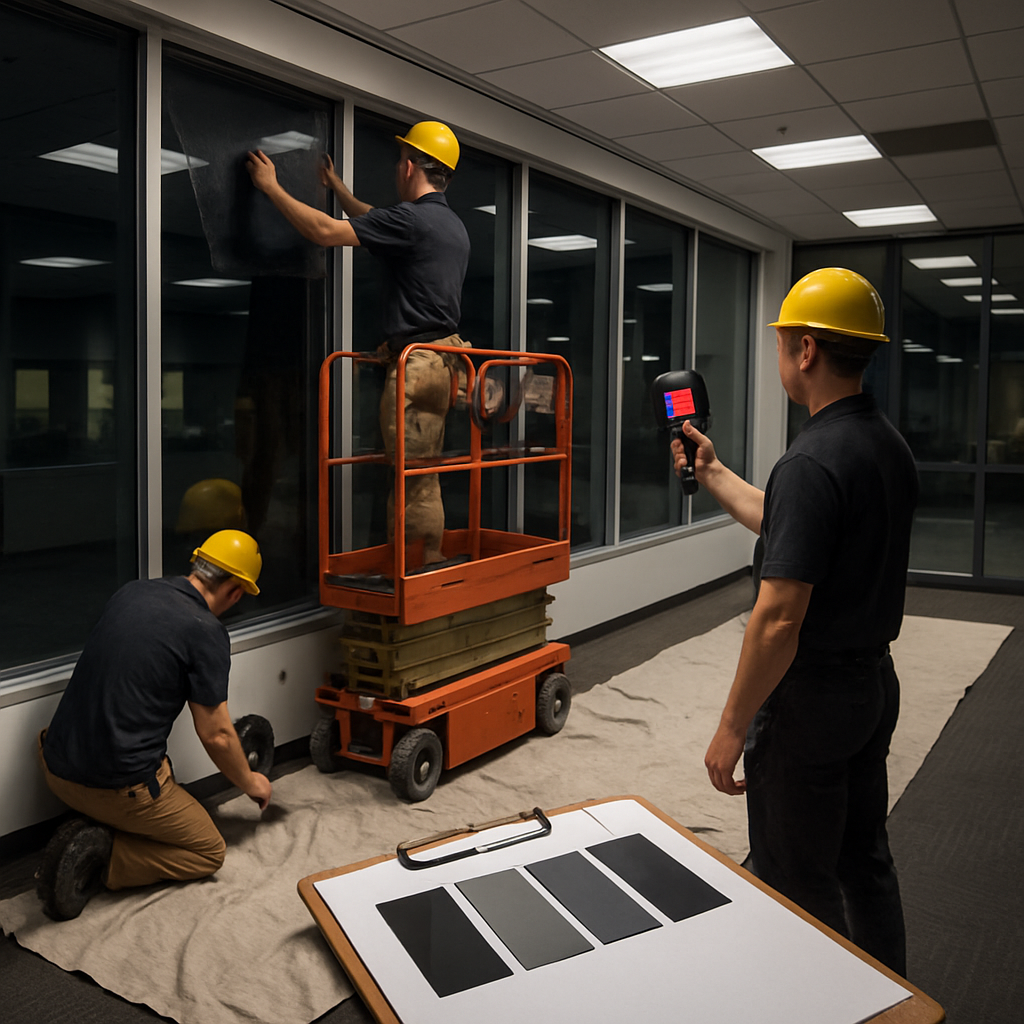
- Staging and access plan: specify crew size, hours (regular vs after‑hours), lift/scaffold needs, supply delivery window, and how tenant spaces will be protected.
- Surface prep and protection: list responsibilities for blind removal, fixture protection, floor coverings, and cleaning products to be used after install.
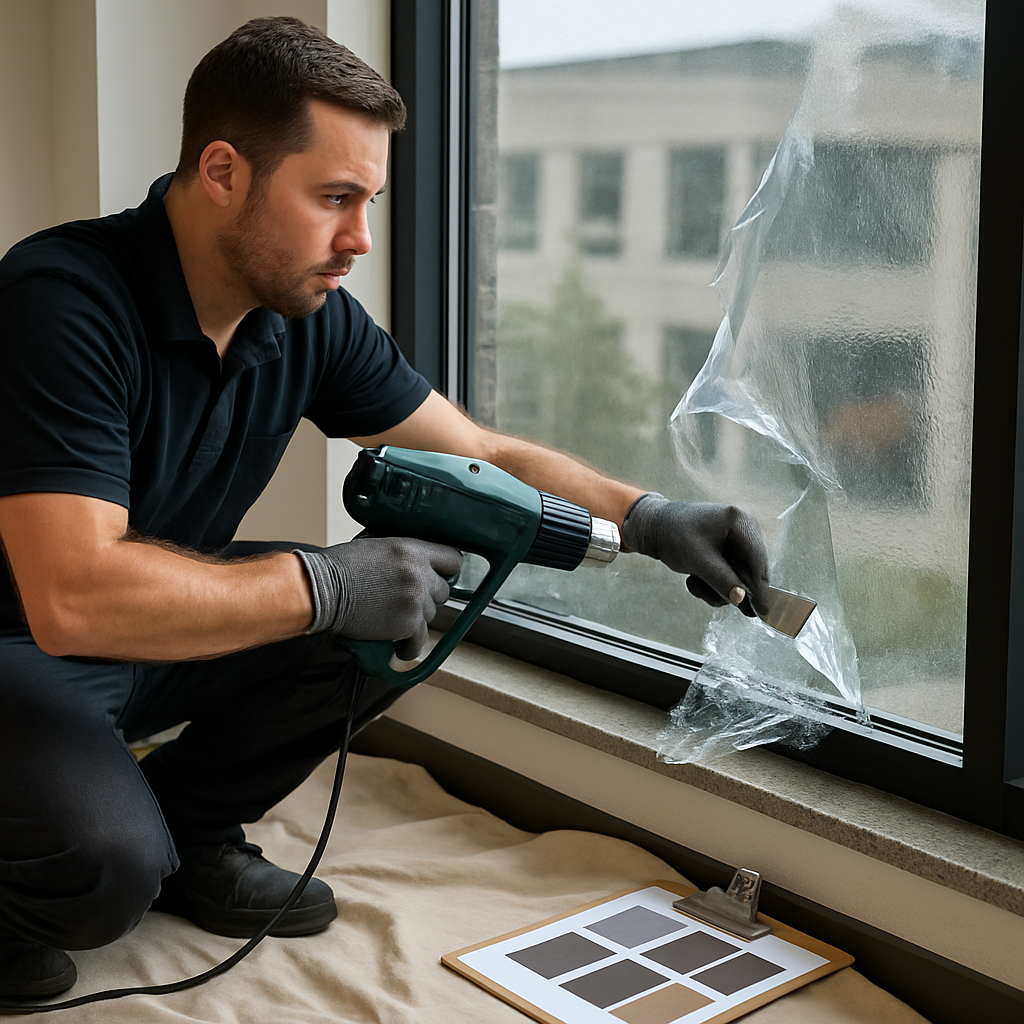
- Installation execution: call out seam methods, edge finishing, adhesive flush procedures, and how waste and residue will be removed.
- Post‑install QA and documentation: finished photos, meter/thermal readings for the mockup and random installed panes, batch/lot numbers, and warranty registration evidence.
Trade‑off to consider. A large crew can finish multi‑floor installs quickly, reducing calendar days on site, but big crews increase noise, elevator usage, and risk to interior finishes. For occupied offices, phased evenings and targeted closures are slower but far less disruptive and reduce tenant complaints.
Concrete example: A five‑story Portland office scheduled a weekend full‑building install with a 6‑person crew. The work finished faster than phased days would have, but HVAC controls were tripped, an elevator was taken out of service unexpectedly, and two tenant suites required extra cleaning. On the next job the owner specified evening shifts for common areas only and a separate day crew for individual tenant suites to avoid those knock‑on costs.
Practical judgment: If an installer hesitates to produce a written protection plan for interiors or refuses to outline who secures exterior permits for lifts, walk away. These are basic project controls — not optional niceties.
Require the installer to submit a signed install plan that includes: elevation map with film SKU per elevation, mockup schedule, lift/scaffold permit owner, crew hours, and a post‑install QA checklist.
Next consideration: When you review bids, score them on the install plan and logistics just as much as price; a detailed plan predicts fewer surprises and a faster path to warranty activation.
Cost, ROI, and incentive questions to include in every quote
Straight to the point: a line on price means nothing unless the quote links that cost to realistic savings, incentive support, and expected lifecycle expenses. If you are searching for office window tinting near me, make the vendor show how their number becomes a business case for your building — not just a sticker price.
What belongs in the cost breakdown. Insist the proposal separate material, installation labor, access equipment, permits, pilot/mockup, warranty registration, and post‑install verification. Hidden charges you should expect to see called out include blind or hardware removal, elevator/dock time, waste disposal, and any after‑hours premiums for occupied suites.
Minimal quote line items to require
- Exact film SKU and unit cost: list the manufacturer, SKU, unit price per square foot, and available lot/batch numbers.
- Labor and schedule: number of installer-hours, hourly rate or fixed labor line, and expected on-site days (include setup/teardown).
- Access and safety costs: lifts/scaffold rental days, certified operators, and any permit fees the vendor will handle.
- Pilot and verification: cost for a single-window mockup plus post-install light/thermal readings and a short M&V note.
- Incentive support fee: whether the vendor will prepare rebate paperwork for Energy Trust of Oregon and if there is a charge or success fee.
- Long-term items: optional financing, prorated replacement options, and estimated annual maintenance costs.
How to interpret ROI claims. Ask for the modeling assumptions — local utility rates (PGE or Pacific Power), HVAC baseline COP, occupancy hours, and whether the model uses measured or manufacturer SHGC/VLT. Vendor payback estimates are typically optimistic; require the workbook so you can change energy prices or incentive levels and see the sensitivity.
A practical tradeoff to consider. Some films produce big summertime cooling reductions but slightly raise winter heating needs on south exposures. That matters in inland Oregon locations with cold winters; the right choice is driven by the building's heating fuel and occupancy pattern, not just the lowest projected annual savings number.
Concrete example: A midwest-style suburban office in Eugene received two bids. Bid A quoted a low material cost but excluded incentive application and offered no post-install verification; Bid B charged more up-front but included Energy Trust rebate processing, batch tracking, and a one-window pilot with thermal readings. After rebate and measured results, Bid B shortened the payback period and avoided a later rework expense — proving incentive assistance and M&V are often worth the premium.
Practical judgment: favor installers who put their numbers on a spreadsheet you can audit and who include incentive assistance as part of scope. Promises of fixed percent savings are fine as conversation starters but not contract terms; require transparent assumptions and an agreed post-install verification step as part of acceptance.
Next consideration: ask shortlisted vendors to submit their cost workbook and incentive worksheet before scheduling final proposals so you can compare net installed cost and projected payback on identical assumptions.
Maintenance, repairs, and removal questions to prevent future surprises
Most surprises happen after installation — usually from cleaning errors, delayed repairs, or an expensive removal that wasn’t budgeted. If you are searching for office window tinting near me, make maintenance and end-of-life costs explicit before signing anything.
Cleaning protocol matters. Ask the installer for a written cleaning schedule and a short approved product list — many manufacturers forbid ammonia, abrasive pads, or strong solvents on their coatings. Using the wrong cleaner is a common warranty killer; mark that in the contract.
Repairs and quick response
Expect damage; plan for fast fixes. Require the vendor to state their repair SLA (response window, repair versus replacement rules) and to supply a small reserve of matching film for touch-ups. Patching a puncture is usually cheaper than replacing an entire insulated glass unit, but only if the installer has matching lot numbers and trained technicians available.
Trade-off to accept: vendors who keep spare stock and local technicians cost more up front but drastically reduce tenant disruption and downtime. Vendors that ship replacement film from out of state can leave you waiting weeks and paying overtime for lifts when schedules compress.
Concrete example: A Portland law firm had a tenant move-out that scratched several panes. The local installer on their shortlist had kept a partial roll from the original lot and performed same-week repairs with no visible seam. Another building waited three weeks for out-of-state film and paid double for evening lift time — the patch mismatch was obvious and required a second visit.
Removal, disposal, and contract language you must demand
Removal is not a trivial line item. Ask for a written removal price per square foot, an explanation of when removal will require IGU replacement, and who bears the cost if edge staining or seal failure is found. Confirm whether the quoted removal includes adhesive cleanup and final glass polishing.
- Contract clause to include: installer responsibility for removal damage — clear remedy if seals fail or glass must be replaced.
- Spare material: keep at least 5-10% of installed film on-hand for repairs, with documented lot numbers.
- Approved cleaners: list brand names or product formulations and training for building maintenance staff.
- Emergency repair SLA: maximum response time, after-hours cost cap, and a fixed hourly rate for lift/equipment.
Important: require the installer to deliver a one‑page Maintenance & Removal packet that includes approved cleaners, repair contact, spare-roll inventory, and a removal price schedule before final payment.
Next consideration: when evaluating local office window tinting experts, compare their Maintenance & Removal packet side-by-side — not just the material cost. If you want a template or example packet to use when you request quotes, see Tinting Oregon commercial services for sample documentation and local references.
Sample site-visit checklist and RFP items to send to shortlisted vendors
Direct note: The site visit and the RFP are where vendors either prove competence or reveal gaps. Treat the visit as a testing opportunity — collect measurable evidence, set an acceptance bar for a pilot, and put clear deliverables into the RFP so bids are comparable.
On-site survey — what to record (bring these tools)
- Template elevation sketch: mark every façade, orientation, glazing type and label representative window IDs so proposals map to the same scope.
- Photos with context: capture each elevation, close-up of edge seals, IGU spacers, visible glass markings, and include a timestamped photo of the glass manufacturer code when present.
- Two representative measurements per glass type: digital caliper for thickness, tape for sash sizes, and record whether glass is tempered, laminated, low-e, or coated.
- Simple instrumentation: a handheld light meter for VLT checks and a thermal camera or infrared thermometer to log surface temperature differences on sunny vs shaded panes.
- Operational constraints: note elevator capacity, loading dock access, rooftop scaffolding zones, after-hours staging windows, and any tenant-sensitive suites.
- Occupant impact log: collect a short list of specific occupant complaints (hot desks, glare hours, privacy gaps) and hours of peak discomfort to guide film selection.
Practical constraint: you cannot test every pane. Sample by orientation and glass construction. A single pilot per glass type and exposure typically reveals whether the chosen film performs in-situ.
RFP items to require from each shortlisted vendor
- Exact product identification and test data: manufacturer, SKU, full NFRC label or independent lab report, and the spectral transmission curve for the quoted SKU.
- Mockup plan and acceptance criteria: date, location (by window ID), method (light meter and thermal image), and a written acceptance threshold (for example, >=30% surface temp drop on west panes without VLT <50%).
- Itemized price and schedule: square footage by window ID, labor, lifts/scaffold, permit duties, pilot cost, and removal pricing per square foot.
- Warranty and registration commitment: attach manufacturer warranty PDF, installer workmanship warranty, and a contractual clause obligating the installer to register the job with the manufacturer and deliver confirmation.
- Post-install deliverables: batch/lot numbers, finished photos by window ID, M&V short report, and a list of approved cleaners and spare-roll inventory left on site.
- Insurance and references: scanned COI naming you additional insured for the job and three recent, contactable Oregon commercial projects with similar glass and access complexity.
- Rebate assistance and M&V scope: explicit statement whether the vendor will prepare Energy Trust paperwork (Energy Trust of Oregon) and provide measurement services required by the rebate.
Trade-off to consider: demanding every administrative item up front can filter out small, competent local shops that do good installs but lack administrative horsepower. Still, any vendor that balks at a pilot with measurable acceptance criteria or refuses to commit to warranty registration is a practical risk — do not accept that.
Real-world example: A Portland owner insisted on a mockup with thermal imaging and a written pass/fail. One bidder produced NFRC data and passed the mockup; another could not supply the spectral curve and failed the pilot. Choosing the demonstrably measured solution avoided a full-building rework later and made rebate paperwork straightforward.
Must-have RFP item: a scheduled pilot with measurable acceptance criteria plus a manufacturer compatibility letter for your exact IGU type.
Next consideration: when you send this RFP, attach your elevation sketch and insist vendors return a completed survey form and a mockup schedule. That keeps bids comparable and surfaces vendors who treat due diligence as optional.
Local examples and quick case illustrations for Oregon office buildings
Reality check: local glazing, building orientation, and neighboring context decide whether a film works — not the catchphrase on a vendor website. If you are searching for office window tinting near me, insist on scenarios that mirror your property: downtown canyon effects, historic façades with preservation rules, and inland summer heat behave very differently.
Three real-world Oregon scenarios
Urban midrise, west-facing curtain wall (Portland conditional): An owner in the Pearl District fought late-afternoon glare and overheated conference rooms. The practical outcome was a spectrally selective ceramic film with moderate VLT that cut NIR heat while keeping daylight; the installer staged a small mockup to check exterior reflectance because nearby residences had complained about mirror-like panels in a prior project.
Suburban two-story office campus (Eugene): A marketing firm wanted privacy for interior glass offices without dimming collaboration spaces. They used frosted decorative films on perimeter offices and a high-VLT, NIR-rejecting film on open-plan glazing. Tradeoff: decorative film solved privacy but required more interior artificial lighting in late afternoons, so the owner adjusted lighting controls to reclaim energy savings.
Small tech office with high solar load (Bend): Summer cooling costs were spiking because of large southern panes and a rooftop PV array nearby. The team selected a low-SHGC, non-reflective film to reduce cooling demand while avoiding any specular reflectance that could lower PV yield. The installer provided a short thermal-imaging report showing peak glass surface temps falling by noticeable margins after the pilot.
A few practical constraints that matter in these cases: reflective films can solve glare fast but often trigger complaints or municipal design review in dense urban areas; decorative films meet aesthetics and privacy requirements but can worsen evening interior lighting needs; and some low-e IGUs require manufacturer signoff before any film is applied to avoid thermal stress. These are not theoretical — they are the failures you will pay to fix if you skip them.
Local tactical tip: Before you approve work, require a one-window mockup and a short acceptance checklist (light meter reading, thermal image, and an exterior reflectance check). If you plan to use incentives, get pre-approval from Energy Trust of Oregon — some rebates require documentation before materials are ordered.
Next consideration: when you shortlist local office window tinting experts, ask each for a scenario-specific justification and the mockup results tied to your elevation. If a vendor cannot explain how their chosen film balances VLT, SHGC, and exterior reflectance for your exact façade, they are not ready to be your installer.