
Professional Window Tint Installation Checklist: What Our Technicians Inspect Every Time
Planning a tint job for a home or commercial property in Oregon requires a clear standard for quality. This professional window tint installation checklist walks through every inspection step our technicians perform — from pre-install glass assessment to edge treatment, curing expectations, and final customer sign-off — so you can spot problems, confirm warranty and rebate requirements, and avoid common failures like bubbling or edge lift. Read on for the concrete checkpoints, local considerations for low-e glass and Energy Trust of Oregon rebates, and the exact questions to ask before you approve the job.
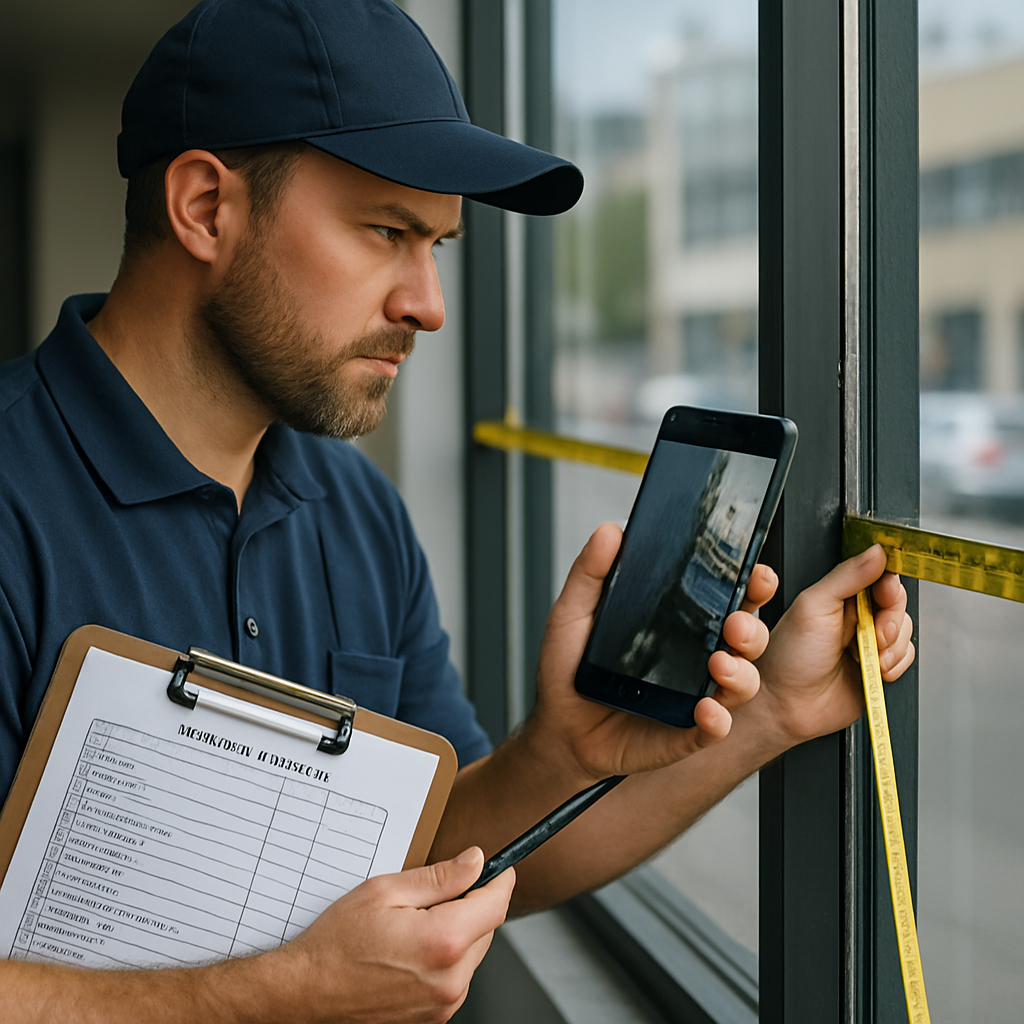
1. Pre-installation site survey and documentation
Start strong: the pre-installation survey is not paperwork busywork – it is the quality gate that prevents most early failures. A thorough survey documents glass condition, confirms access and constraints, and establishes the baseline needed for warranties and local rebate programs.
What technicians record and why
Glass type and condition: technicians identify annealed, tempered, laminated, and insulated glass units and note low-e coatings or existing film. Why this matters: some coatings are sensitive to heat or adhesives and failing IGUs will trap moisture under film leading to delamination.
- Access and logistics: confirm door keys, elevator availability, parking, work hours, HOA or historic district restrictions and entry procedures for Portland, Salem, Eugene, or Bend sites.
- Measurements and photos: measure each pane for film takeoff, and photograph edges, chips, scratches, hard-water stains, and existing seal failures for warranty and rebate proof.
- Compatibility check: match the chosen film SKU to manufacturer data sheets to ensure VLT and heat rejection meet the project brief and municipal code where applicable.
- Rebate documentation: verify product eligibility and note the paperwork required for Energy Trust of Oregon or other local incentives; capture product spec pages or reference numbers.
- Safety and surface conditions: flag surfaces that need repair or deep cleaning before installation, like heavy etching or silicone overspray that will prevent adhesion.
Practical tradeoff: installers sometimes accept small cosmetic flaws to avoid a costly window replacement up front, but that increases the risk of early film failure. The technician must decide whether to proceed with clear documentation or pause the job until the glass is repaired.
Concrete Example: on a downtown Portland office remodel, a site survey found a failing IGU with internal moisture on three south-facing units. The installer photographed the condition, declined to film those panes, and returned with documentation the client used to get the windows replaced before tinting. That avoided a warranty dispute and a likely rework within a year.
Common mistake we see: skipping dated photos and signed pre-install reports. In practice this creates conflict when rebates are audited or when customers report bubbling months later. Well-documented pre-installation records remove ambiguity and protect both parties.
Where to check rebate rules: technicians should verify eligibility against local programs such as the Energy Trust of Oregon; installers who handle this step reduce friction for customers and increase the chance of rebate approval. See Energy Trust of Oregon and our page on Window Film Energy Rebates in Oregon.
2. Film selection and specification verification
Key point: Verify the exact film SKU and manufacturer datasheet before any cutting or application. Matching the physical roll in the truck to the job specification is not paperwork busywork – it preserves warranty, determines eligibility for rebates, and prevents costly rework.
What technicians check: Confirm Visible Light Transmission (VLT), solar heat gain coefficient or Total Solar Energy Rejected (TSER), UV blockage percentage, and the film orientation for installation. They also confirm whether the film is rated for interior or exterior application and whether edge sealant is required for the environment.
Specification checklist technicians use on every job
- SKU and lot number: record for warranty traceability and photo with invoice
- VLT and SHGC/TSER values: match to the customer signed spec and rebate paperwork
- Film construction: dyed, metallized, ceramic, or hybrid – note implications for reflectance and signal interference
- Compatibility notes: low-e coatings, laminated glass, tempered or heat-strengthened glass restrictions
- Installation orientation: recommended face in/out and wet vs dry application method per manufacturer
- Warranty terms and exclusions: especially for coastal or high-moisture exteriors
Practical tradeoff: Lighter, spectrally selective films cost more but deliver heat rejection without the dark look. If the priority is energy rebate qualification in Oregon, prioritize documented SHGC improvements over VLT alone. In practice a slightly higher upfront cost for certified performance usually pays back in occupant comfort and rebate eligibility.
Limitation to watch for: Some low-e coatings and failing insulated glass units are incompatible with retrofit films. Installing film on an IGU with a compromised seal or on certain coated glass can trap heat and accelerate seal failure. When a technician documents incompatibility, that often means a glass repair or replacement before proceeding.
Concrete Example: A downtown Portland office requested darker film for glare reduction but also wanted to apply for an Energy Trust of Oregon rebate. The technician recommended a 3M spectrally selective film with verified SHGC values and recorded the SKU and lot number on the project file. That documentation allowed the customer to submit rebate paperwork and avoided the common mistake of buying a cheap dyed film that would have failed the rebate criteria.
Judgment call installers make on site: Retail or DIY films rarely include the tested thermal performance numbers or sustained warranties required for commercial work or rebate programs. For customers who care about long term performance, insist on manufacturer data sheets and lot number documentation rather than a visual sample alone. See our discussion on buying professional vs retail film for more context at Where to Buy Window Tinting Film: Retail vs. Professional-Grade Options and Costs.
Next consideration: After specification verification the installer moves to a small test patch or mockup on a low-visibility pane when compatibility is uncertain. That test is the simplest practical safeguard against awkward surprises during full application.
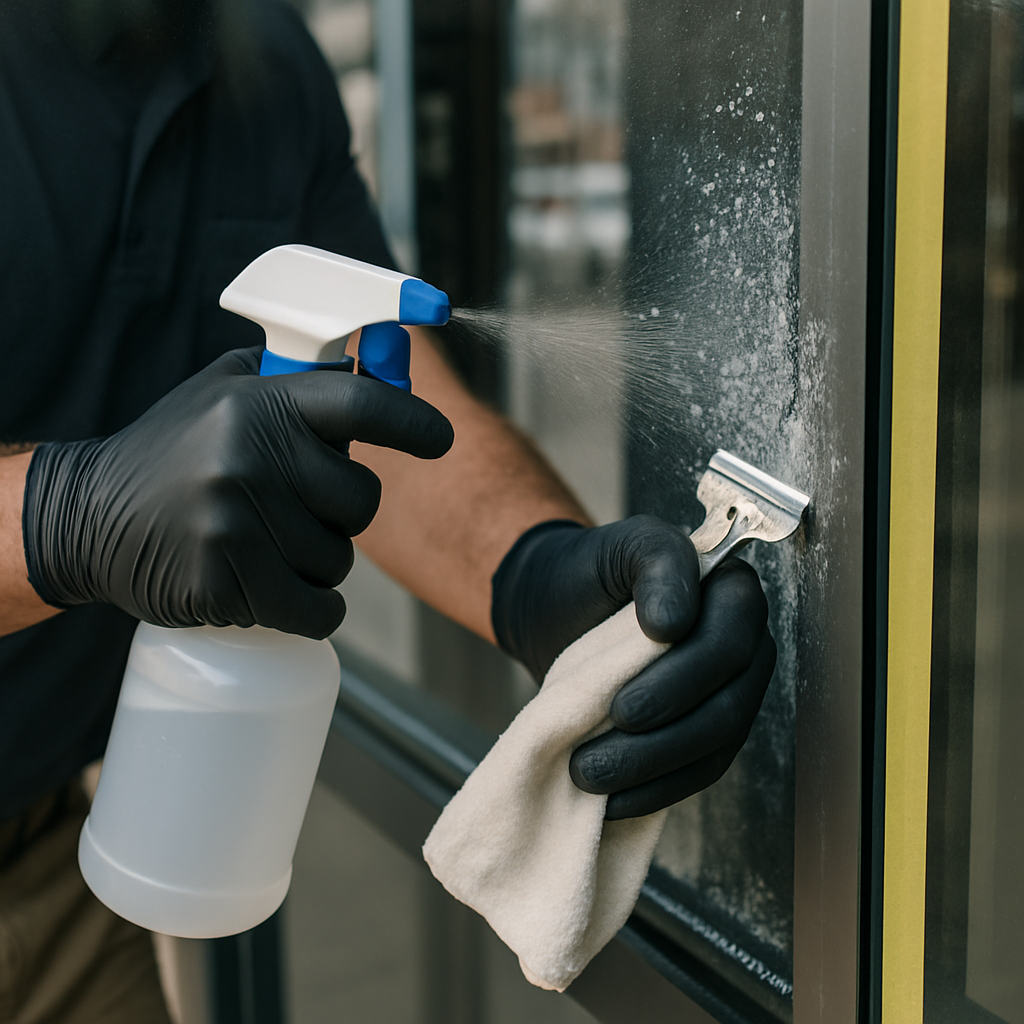
3. Glass and frame preparation checklist
Key point: Proper glass and frame preparation is not optional — it prevents the most common early failures such as edge lift, adhesive contamination, and trapped minerals that show up weeks later. Clean glass and solid perimeter conditions are the foundation of any reliable install; if a technician rushes this step, the job will cost you twice.
Step-by-step surface prep checklist
- Visual glass sweep: Inspect for hard water etching, paint or silicone overspray, chips, and fogged insulated glass units. Note anything that will interfere with adhesion and mark it for remedial action.
- Contaminant removal: Use manufacturer-recommended cleaners and lint-free tools to remove oils and residue. Do not use abrasive pads or unknown solvents on coated or low-e glass; test first on an inconspicuous area.
- Stubborn deposits: For mineral scale and paint, technicians use controlled wet scraping with a single-edge razor at a low angle and repeated solvent-soak cycles. This works, but it carries a trade-off: aggressive scraping can reveal or worsen underlying etching that film will not hide.
- Seal and frame check: Confirm glazing beads, sealant, and weatherstripping are intact and compressing correctly. Any loose glazing or rotten wood must be repaired first or the film will lift at the edges.
- Perimeter prep: Remove loose caulk, clean the rebate, and route or shave glazing tape so the film edge can tuck under or sit against a secure lip when required by manufacturer instructions.
- Protect adjacent finishes: Mask frames, sills, and interior finishes with drop cloths and painter's tape. Adhesive and cleaning solutions migrate; a small protection step prevents visible damage to paint and fabrics.
- Final wipe and inspection: Finish with a lint-free wipe and inspect under angled light to catch micro-dust and streaks before bringing film into contact.
Practical trade-off: Spending extra time to remove hardened mineral deposits or to repair a failing IGU increases labor and may delay the job — but it buys far more longevity than applying film over marginal glass. In practice, replacing a bad insulated unit before tinting is usually cheaper than replacing the film a year later.
Concrete example: A small downtown Portland café had months of sprinkler mist and mineral staining on the street-facing windows. During prep we found thin surface etching that regular cleaners could not remove. We paused the job, recommended IGU replacement for two windows and resealed the frames on three others; the extra day and cost prevented visible haze and edge failure that would have surfaced during summer sun exposure.
Practical judgement: Many installers underbid by skimping on prep. If your installer refuses to test-clean questionable spots or declines to document frame condition, consider that a red flag. Ask them to show a small test clean and to provide a compatibility confirmation for coated or low-e glass — the manufacturer installation guide should back it up (see 3M installation guides for reference).
Next consideration: if your windows are older, request a documented glass-condition report and a written recommendation for repairs or IGU replacement before proceeding to cutting and adhesion steps.
4. Installation technique and in-process quality checks
Installation technique decides longevity. A correctly chosen film will still fail quickly if the technician sacrifices proper fit, dust control, squeegee method, or heat technique for speed. These in-process checks are where workmanship separates a lasting job from early call backs.
Core in-process checks technicians perform
- Cutting and fit method: Confirm whether the installer is using pre-cut templates, wet-cut on glass, or performing back-buttering. Each method has a place; using the wrong one for the glass geometry increases trimming errors and edge stress.
- Particle control before squeegeeing: Inspect with a bright light and low angle to catch dust specks. Technicians should remove visible particulates with a sticky lint roller or microfibers before final squeegee work.
- Squeegee sequence and pressure: Look for controlled overlapping strokes from center outward, not random scrubbing. Excessive pressure or wrong angle leaves adhesive trails or fish-eyes.
- Heat application and tension control: Use measured heat to relax and conform film on curves. Overheating causes shrinkage, optical distortion, and may damage low-e coatings, so follow manufacturer temperature guidance precisely.
- Edge clearance and final trim: Verify a consistent 1.5 to 3 mm gap to frame where recommended, and that corners are free of jagged cuts. Inconsistent trimming is the fastest route to edge lift.
- Optical distortion check: After any heat work, view from multiple angles under natural light to detect waviness or ghosting before signing off.
Practical limitation and tradeoff: Speed reduces labor cost but increases risk. Fast installers often skip angled light checks and aggressive squeegee inspection. That shortcut shows up as microbubbles and peeling within months, which then becomes a warranty issue. Professional-grade installs accept slightly longer on-site time as a cost of avoiding callbacks.
Manufacturer rules matter more than habit. Some films forbid back-buttering or require specific heat gun distances and temperatures. Following the product data sheet maintains warranty eligibility and prevents damage to low-e coatings. When in doubt, technicians should stop and confirm the spec, not improvise.
Concrete example: On a curved automotive rear window the technician used a back-butter technique plus low, incremental heat to conform the film without creating pleats. That required extra squeegee passes and slow heating to avoid shrink lines. By contrast, on a 8-foot commercial fixed storefront we used wet-cut templates and careful trimming to eliminate seams and reduce time at risk of contamination.
Quick verification actions you can watch for during installation
- Angled light check: Technician pauses and inspects the panel with a handheld light to catch dust or microbubbles.
- Squeegee pattern demo: Technician demonstrates a center-out stroke on one pane before doing the rest.
- Heat test patch: Technician heat-treats a small area and checks for optical stability before full heating.
- Edge sample: Ask to see a finished corner so you can confirm even gap and clean trim.
- Paperwork spot check: Technician records film SKU and lot number for warranty traceability, as in our Where to Buy Window Tinting Film.
If a technician skips an angled light check or rushes the heat pass, pause the job. Those shortcuts create the most common early failures.
For more on installation standards and manufacturer guidance consult 3M installation resources and the International Window Film Association. Next check the perimeter and moisture controls to avoid edge lift and trapped humidity.
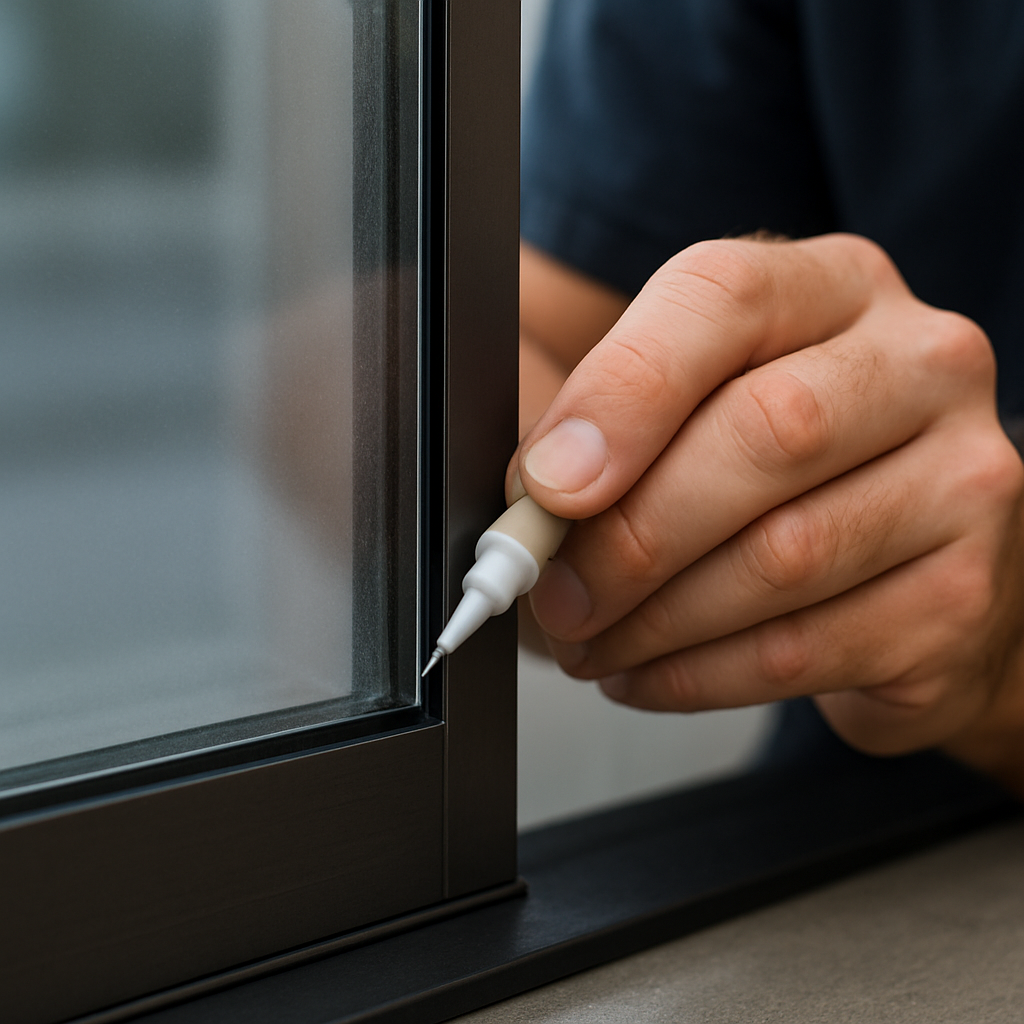
5. Edge treatment, perimeter sealing, and moisture control
Edges are the failure point more often than people think. Most premature film delamination, edge lift, and adhesive breakdown start at the perimeter where moisture, dirt, or UV-driven shrinkage attack the bond. A professional window tint installation checklist must treat edge work as a distinct inspection item, not an afterthought.
What we inspect and why it matters
Edge adhesion: We check that film sits flush to the glass with no visible lift around the full perimeter. Even a millimeter of lift becomes a moisture entry point. If edges are lifting, the correct response depends on cause — poor prep, incompatible adhesives, or a failing insulated glass unit.
Sealant selection and application: We verify the use of a manufacturer-recommended edge sealant when conditions demand it (exterior film, coastal or high-humidity sites, or bottom-edge exposure on storefronts). Using the wrong chemistry or over-application creates mess and can discolor trim; using none when required invites early failure.
- Inspect IGUs before sealing: Confirm no existing fogging or trapped moisture in double-pane units; do not seal over a failing IGU because you will trap moisture and mask the underlying problem.
- Match sealant to film and frame: Use sealants specified by the film manufacturer — acrylic or polyurethane variants are common. Avoid DIY glues and generic silicones that void warranties.
- Bottom-edge protection: For exterior-facing installations and storefronts request hem bars, drip edges, or bead seals to shed water instead of relying on sealant alone.
- Cure and ventilation control: Note recommended cure times and advise minimal cleaning and adequate ventilation to avoid trapping moisture under the film during the initial days.
Trade-off to accept: Visible edge sealant improves longevity in wet environments but may alter the clean appearance of high-end residential jobs. For offices or industrial buildings I prioritize durability; for premium residential glass we discuss discreet sealing techniques or tuck-in installs and accept a slightly higher long-term maintenance risk if the customer prefers invisible edges.
Common misunderstanding: Customers often assume a good glass surface equals a lasting install. In reality, an otherwise perfect install fails quickly if perimeter details are skipped. Good glass plus careless edge work equals early call-backs.
Concrete example from the field
Concrete Example: On a coastal Portland storefront we saw recurring bottom-edge lift within 12 months after a retail-level install. After replacing the inferior sealant with a 3M-approved edge sealer, adding a hem bar at the sill, and documenting the IGU condition, the same panels showed no edge issues after three years. The cost of correct edge treatment was far lower than repeated reworks and lost retail hours.
A professional installer inspects the unit seals first; never use edge sealing to hide or delay required IGU repair.
Practical checklist items to demand at final sign-off: Verify the installer recorded the film lot and sealant SKU, photographed all edges after curing, confirmed no trapped moisture in IGUs, and provided cure-time cleaning guidance. If any of those are missing, you do not yet have a finished job.
Next consideration: confirm warranty language about edge sealing and environmental exposure before you sign off so you know what the installer must do if edge problems develop.
6. Post-install quality inspection and performance verification
Final verification is not cosmetic — it proves the install will last. Technicians run a measured checklist after squeegeeing and heating: visual checks under multiple lighting conditions, transmittance/reflectance verification where required, mechanical operation tests, and documented sign-off. Skipping any one of these steps is how small defects become big failures later.
What technicians verify during the post-install pass
- Multi-angle visual inspection: Look for pinholes, micro-bubbles, vertical lines, or optical distortion by viewing from near- and far-field and with backlighting.
- VLT and reflectance check when required: Confirm the installed film matches ordered specs; this is essential for rebate qualification and for avoiding municipal VLT violations.
- Window operation and seals: Open/close sashes, check locking points, and confirm film does not interfere with hardware or weatherstripping.
- Perimeter integrity: Inspect for adhesive bleed, undercutting, or inadequate edge contact that will create edge lift in months.
- Thermal/optical stress look: Scan for stress patterns or iridescence on coated glass and confirm no new fogging in IGUs after temperature stabilization.
- Documentation: High-resolution photos (backlit and front-lit), film SKU/lot, technician sign-off, and time-stamped notes for warranty/rebate records.
Practical limitation: Handheld VLT meters and cheap reflectometers give useful ballpark numbers but can misread on curved glass, low-e coatings, or when measured before full cure. Use those readings for compliance checks and rebate paperwork, but rely on manufacturer tolerance ranges rather than single-point numbers when deciding whether a panel passes.
Trade-off to accept: For large commercial installs we sometimes delay final measurements 24–72 hours to allow residual moisture and tension to settle. That reduces false failures but means the customer walkthrough may need a short follow-up, which should be communicated up front.
Concrete example: On a downtown storefront job a glare reduction film appeared perfectly flat under shop lighting. When the tech inspected with strong backlighting they found a 1/4-inch misalignment on the upper edge that ruined the visual symmetry from the street. We re-cut and re-seated that panel the same day; without the multi-angle inspection the client would have discovered the defect after business hours.
What too many installers miss: High-quality photos under backlight conditions catch optical defects that casual inspection misses. Also, installers who fail to record film SKUs and lot numbers create warranty gaps. These are not bureaucratic steps — they materially affect your ability to claim warranty or rebate benefits later.
Next consideration: If you are pursuing Oregon rebates, make sure your installer documents product specs and verification steps; see our guide to Window Film Energy Rebates in Oregon: How to Qualify, Apply and Maximize Savings and check local program rules at Energy Trust of Oregon.
7. Customer walkthrough, maintenance handoff, and warranty paperwork
Final sign-off is an active handoff, not an afterthought. Technicians should use the walkthrough to convert work into a durable service relationship: demonstrate the finished surfaces, review cure expectations, deliver warranty documentation, and get the customer to acknowledge both the visible condition and the steps required to preserve coverage.
What a proper walkthrough covers
- Visible condition: show windows from multiple angles in natural and interior light so the customer can see alignment, edge adhesion, and any trapped particulate that will clear during cure.
- Cure period expectations: explain the specific 30–90 day timeline for the film used, what temporary blemishes may self-resolve, and when to report persistent issues.
- Care demonstration: perform a quick cleaning demo with the approved cleaner and a lint-free cloth; tell them what cleaners and tools void the warranty (for example abrasive pads or razor blades).
- Warranty and documentation: hand over manufacturer warranty, Tinting Oregon service terms, and the install checklist with film SKU and lot numbers; confirm the customer receives digital copies for rebate or audit use.
- Issue-report workflow: explain how to report problems, typical response times for inspection and repairs, and any conditional sign-off policies (for example 14-day allowance for hidden defects).
Practical trade-off: getting a quick customer signature for completion is convenient but can create disputes when slow-developing issues appear. Insist on a signed install checklist that also records a 14- to 30-day review period for cure-related issues — that preserves the customer's rights while protecting the installer from claims about pre-existing glass problems.
Concrete example: A small retail tenant in downtown Portland received a three-panel storefront install. During the walkthrough the technician photographed each frame, recorded film SKUs and lot numbers, and demonstrated the approved cleaning method. Two weeks later the tenant reported a faint wrinkle on one panel; because the installer had documented the lot number and time-stamped photos, the tech scheduled a warranty rework and supplied the paperwork needed for the Energy Trust of Oregon rebate application.
Common misunderstanding: customers expect warranties to cover any future discoloration or seal failure without limits. In practice most manufacturer warranties exclude existing IGU seal failures, physical damage, and misuse. Verify exclusions on site and make sure the customer understands what will and will not be honored — that single conversation prevents most warranty disputes.
Two actions to insist on before the crew leaves
- Get copies: request both a physical and emailed copy of the signed install checklist, photos, and warranty paperwork. Use documentation for future rebate claims and for verifying that manufacturer installation protocols were followed. See how we help customers with rebate paperwork in Window Film Energy Rebates in Oregon: How to Qualify, Apply and Maximize Savings.
- Agree on follow-up: schedule a short 2–6 week check for large or high-exposure installs, and confirm the procedure and timeline for any warranty repairs. If you need a site survey or estimate for additional locations, use this request form.
Get the film SKU, lot number, and time-stamped photos on file — those three items determine warranty traceability and rebate eligibility.

Final consideration: insist on clear, retained documentation and an explicit short-term review window. That small overhead prevents most disputes and is the practical line between a completed job and a supported installation.
8. Maintenance schedule and recommended service checks
Baseline rule: set a routine inspection cadence and stick to it. A one-off install is not the product life cycle — proactive checks catch edge lift, adhesive discoloration, and failing IGU seals long before they force full replacement.
Recommended inspection cadence
| Interval | Who does it | Primary checks | Why it matters |
|---|---|---|---|
| Monthly (owner visual) | Building occupant / facility staff | Look for visible edge lift, large bubbles, scratches, or rapid discoloration | Fast detection of storm or impact damage |
| Every 6-12 months (light service) | Technician visit or scheduled virtual review | Photograph edges, check perimeter adhesion, test a representative VLT with handheld if available | Documented condition supports warranty claims and rebate records |
| Every 2-3 years (professional inspection) | Certified installer | Assess edge sealant, inspect IGU seals for fogging, reapply perimeter seal where appropriate | Extends film life and prevents glass damage from moisture trapping |
| End of expected film life (5-10 years depending on product) | Technician | Evaluate for replacement vs targeted repair, verify continued compliance with codes/HOA | Planned replacement avoids emergency costs and optical failure |
- Essential service checks: Verify edge adhesion across the entire perimeter rather than sampling a corner; inspect for micro-delamination (a gray, powdery line under the edge); check IGU seals for any new fogging; confirm that film lot and SKU match warranty records.
- Documentation practice: Keep date-stamped photos and short written findings for each check. Good documentation preserves warranty coverage and simplifies rebate follow-up with Energy Trust of Oregon or installer paperwork.
- When to act professionally: Schedule a technician visit after HVAC changes, significant thermal load changes (new tinting, blinds, or glazing), storms, or visible changes noted during owner checks.
Practical trade-off: too-frequent professional servicing adds cost with diminishing returns; too-infrequent servicing risks adhesive failure and IGU damage. For most Oregon homes and businesses a 6- to 24-month mixed approach (owner monthly checks + technician every 12–24 months) hits the right balance between cost and risk mitigation.
Concrete example: A midtown Portland retail storefront scheduled a 12-month follow-up after installation. The technician found early edge lift near a south-facing door where condensation accumulated seasonally, resealed the perimeter, and recorded photos tied to the film SKU so the work remained under the manufacturer warranty. That single service prevented progressive delamination and a costly full-panel replacement the following winter.
What installers commonly miss: many companies skip photographic baseline records or omit SKU/lot tracking from service logs. In practice that gap makes warranty claims slow or impossible. Demand documented before-and-after photos and recorded SKU/lot numbers during every service visit.
Highlight: schedule a professional inspection after any event that changes thermal or moisture loads (HVAC retrofit, storm damage, major cleaning, or discovery of new IGU fogging).
Next consideration: agree on a maintenance contract or single-visit pricing up front and require documented findings for every service. That small administrative step saves disputes and usually pays for itself the first time an early edge failure is caught.